


Introduction
As the saying goes, a picture is worth a thousand words. In web terms, however, a picture can take up more bandwidth than all the words on your web page combined. In order to make our users’ browsing experience more pleasant we need to make sure that our apps are as streamlined and performant as possible. In this article, we’re going to take a look at optimizing image delivery using NgOptimizedImage.
Let’s build a sandbox
I created a very simple Angular application that uses the JSONPlaceholder API to display a lot of images in a gallery. The entire app is very simple: it receives a list of images, and proceeds to display them, as can be seen in the example below:


While the gallery works, it takes some time to load. That’s not ideal — as we all know, users are impatient. Let’s fix this! To get started, we’ll create a production build, run it locally, and use Chrome’s Lighthouse to analyze the page load.


My tests resulted in the following scores:
- First Contentful Paint (FCP): 2.3 seconds. This is the time between the user navigating to the page and them seeing any content drawn on the screen. Generally, this shouldn’t ever exceed 1.8 seconds.
- Largest Contentful Paint (LCP): 3.3 seconds. This measurement represents the time the page takes to render its primary content. In order to provide a good experience, this time needs to be under 2.5 seconds.
- Cumulative Layout Shift: 1.251. This metric measures the shifts in the page layout throughout its lifespan. You should aim for 0.1 or less.
- Total Blocking Time: 230ms. This is the time that the main thread is being blocked from accepting user input and it is being measured after the FCP. We should aim for a time less than 200 ms.
Let’s examine how we can optimize the page.
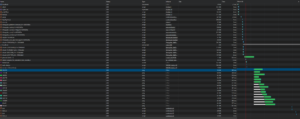
The network resources tab shows us that the page fetches its images only after it finishes processing all of its JavaScript, styles, and fonts. In some cases, such as the image selected in the screenshot above, the browser waits as long as 600ms before downloading the image. Then, it downloads the rest of the assets in parallel, despite many of them not being visible to the user.
A Possible Solution
Following the Core Web Vitals and some common developer sense, we can do several things to improve the site’s performance. As we mentioned previously, the benchmarks we should be hitting are:
- First Contentful Paint < 1.8seconds
- Largest Contentful Paint < 2.5 seconds
- First Input Delay < 100 ms
- Cumulative Layout Shifts < 0.1
- Chrome Lighthouse score > 85
In order to accomplish this, we need to take several steps:
- We need to optimize the images. By this I mean prioritizing which image gets downloaded first — and requesting it earlier, if possible.
- We need to improve the loading speed of the application. To this end, the LCP score needs to be below 2.5 seconds.
- Looking at the <img> tag specification, it possesses a number of attributes that we can use to optimize image loading. These are:
- fetchpriority
- loading
- sizes
- srcset
- We need to implement lazy loading for images that aren’t visible on the initial load. In general, for most applications images should only be loaded when they’re about to be displayed — that way, we free up a significant amount of user bandwidth.
Normally, once presented with a list like that we’d figure out create an image component, a directive, or a wrapper and build all of the logic ourselves. For this particular task, however, we can simply use an out-of-the-box solution: the NgOptimizedImage directive.
The NgOptimizedImage Directive
Optimizing images is such a common use case that the Angular dev team have created a ready-made solution in the form of the NgOptimizedImage directive, available from version 13.4.0 onwards. In order to use it, we can import it from @angular/common and add it to the imports array of our component or module.

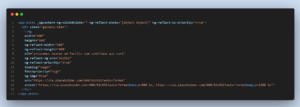
In order to make the img tag work, we need to change our src attribute to ngSrc. We also need to specify a width and height — otherwise, we will error out. Providing a set width and height prevents image-related layout shifts, after all.

Once we get that sorted, we get the following error:

This informs us that the specified image is the LCP element — however, it is not marked as a priority. Fixing this forces the image to be prioritized while loading, ticking another box off our list.

After adding the priority flag, the img tag now looks like in the screenshot above. However, this isn’t the end of our troubles. There’s another warning to contend with.

As suggested by the warning, you need to add the domain name of your image server as a preconnect tag in the <head> section of the document. This, again, helps speed up image loads. In our example we’re using the placeholder domain; you, however, should substitute it for your server.

Now that we’ve added the preconnect domain, our console is finally free of warnings and errors. We can now inspect the page to see what Angular did to our images.
We can see that the img tag now has several attributes added to it. Its loading is set to “eager” — the possible values here are “lazy”, which is the default behavior, as well as “eager” and “auto”. Additionally, there’s now a fetchpriority attribute, set to high. Angular also generated a srcset for the image — it’s used to ensure the images are always requested at the correct size.
The next image we inspect shows these attributes:

As you can see, its loading is set to “lazy”, and its fetchpriority is set to “auto”. This makes the image less important, so as to lower its impact on the application’s performance.
In the comparison below, we have two pages: one using NgOptimizedImage, and one without. The first screenshot shows the browser’s attempts to fetch and load all the images, which block script execution. The second screenshot shows a much more optimized approach — only loading the images currently visible on the screen.
Without ngSrc

With ngSrc and NgOptimizedImage directive
So far, we’ve only imported NgOptimizedImage and implemented its suggestions. Let’s make a build and run the tests again to see if we managed to improve our performance at all.

Well, the results can’t be argued with. We managed to significantly improve every metric we’ve looked at. This is especially remarkable when you consider the amount of effort it took us to achieve this result.
We can go further, though. NgOptimizedImage provides us with more options which we can leverage to fine tune our application’s performance.
- fill — this attribute absolves us of the need to provide the image’s width and height by simply making it fill its parent element. However, the parent element’s position must either be “relative”, “fixed”, or “absolute”. The image’s object-fit can then be set to “contain” or “cover”.. t
- ngSrcset — a comma separated density descriptor.
- sizes — this attribute can be used for responsive images. By default the responsive breakpoints are [16, 32, 48, 64, 96, 128, 256, 384, 640, 750, 828, 1080, 1200, 1920, 2048, 3840]. ngSrcset and sizes are meant to work together. If the ngSrcset attribute is present, a srcset will be generated based on the specified sizes.
- Image loaders — this function takes a provided URL and transforms it. For instance, if you don’t want to have to provide the full image URL every time, you can use take the afterLoaderImgUrl and pass it to ngSrc directly, like in the example below.

Angular offers a few predefined loaders, and you can always create your own.
Of course, this is only the tip of the iceberg. To learn more about the options provided by the directive, read the full NgOptimizedImage documentation.
Conclusion
Setting up and working with the new NgOptimizedImage directive is remarkably straightforward. By merely importing it and implementing its suggestions, I improved the overall performance of my demo application to a significant degree. What’s more, this was a matter of minutes, rather than the days or even weeks of work it would have taken otherwise.
With additions like these, Angular continues to reign supreme over other frameworks in developer friendliness and performance. I can’t wait to see what they have to offer next!
Leave a Reply