

It’s time for a follow-up after a “short” break. What has previously been discussed? See here. What’s on the agenda today?
We will focus on the responsibilities of the initial state flag in Angular’s router and we’ll pay attention to data transfer between client and server.
How to inform the browser that I did something on the server – TransferState in practice:
Surely you’ve downloaded data on the server or found yourself in a situation when you had to send something from the server application to the client’s. A short research leads you to information about TransferState. What is it? According to the documentation:
“A key value store that is transferred from the application on the server side to the application on the client side.”
So what do we need in order to make use of it – let’s start with importing the ServerTransferStateModule on the server side and the BrowserTransferStateModule on the client’s side, so that we can use the mentioned service. Now we have everything we need to use TransferState in our application. Example – trivial component which shows a random color on the screen.
|
1 2 3 4 5 6 7 8 9 10 11 12 13 14 15 16 17 18 |
@Component({ selector: 'app-random-color’', template: `<div [ngStyle]=”{elStyle}”>Color</div>`, styleUrls: ['./random-color.component.scss'] }) export class RandomColorComponent implements OnInit { elStyle={}; ngOnInit(): void { this.elStyle.color=this.generateRandomColor(); } private generateRandomColor(): string { const color = ((1 << 24) * Math.random() | 0).toString(16); return `#${color}`; } } |
Easy enough? Sure! Though, it causes one problem – the server application returns a different color than the client’s app. How to manage it? Use TransferState to transfer the color from the server. Let’s modify our code:
|
1 2 3 4 5 6 7 8 9 10 11 12 13 14 15 16 17 18 19 |
export class RandomColorComponent implements OnInit { elStyle={}; private readonly colorKey = makeStateKey<string>('random_color'); constructor(@Inject(PLATFORM_ID) private readonly platformId: any, private readonly transferState: TransferState) { ngOnInit(): void { if (isPlatformServer(this.platformId)) { this.elStyle.color = this.generateRandomColor(); this.transferState.set(this.colorKey, this.random); } else { this.elStyle.color = this.transferState.get(this.colorKey, this.generateRandomColor()); } } ... } |
What happened here? First we injected our platform identifier and our TransferState to the constructor. Next we generated a key using the makeStateKey method – thanks to which we’re saving an object with the key ‘random_color’, which is a string type. Then we have generated color on the server, which we save and transmit to the browser. After loading the client’s application we simply retrieve the value with the given key from our TransferState. The get-method receives 2 parameters – the first one is a key which we want to use to get values, second is a default value in case finding the specific key value wouldn’t be possible. A lot of explaining, but the proceeding itself is very simple.
What can this be used for? Basically for anything we need. In my applications I used to add information about the user’s country, taken from the request header. However this mechanism is mostly used for cashing http requests, so that we don’t have to download them again in the client’s application. You don’t have to do it yourself, this mechanism is ready.
How is the data transferred to the client’s application?

The given name in our app.module is where id script is: BrowserModule.withServerTransition({appId: ‘serverApp’}),
“Where is my view?” – initial state and it’s problems:
Everyone probably noticed that using SSR causes a slight change in the root routing module, that is setting the initial navigation flag to enabledBlocking.
|
1 2 3 4 5 6 7 8 |
@NgModule({ imports: [RouterModule.forRoot(routes, { initialNavigation: enabledBlocking })], exports: [RouterModule] }) export class AppRoutingModule { } |
So why do we need this? Namely in order to determine the sequence of events – whether we bootstrap the application first and then we initialize routing or whether we await the routing action to execute and then bootstrap the application. Let’s check the documentation:
‘enabledNonBlocking’ – (default) The initial navigation starts after the root component has been created. The bootstrap is not blocked on the completion of the initial navigation.
So this is the default behavior, which can be visualized as follows:
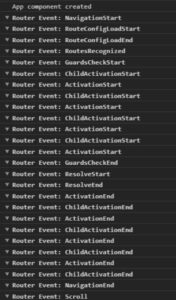
As you can see, the bootstrapping of the components took place first, followed by routing actions.
‘disabled’ – The initial navigation is not performed. The location listener is set up before the root component gets created. Use if there is a reason to have more control over when the router starts its initial navigation due to some complex initialization logic.
We won’t stop here for long – we decide when to initialize the router. Example of usage – ngx-translate-router package.
’enabledBlocking’ – The initial navigation starts before the root component is created. The bootstrap is blocked until the initial navigation is complete. This value is required for server-side rendering to work.
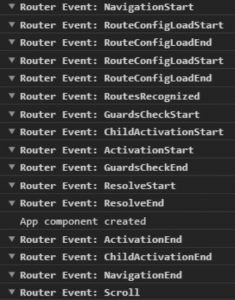
This flag interests us the most – to put it simply, firstly routing undergoes initialization and only after it’s completed does the bootstrapping of components take place. Why is that? This happens in order to avoid double site loading or application flickering when switching from the server to the client’s version. It is especially noticeable when lazy loading for modules is used – first we see the server component, then a screen flick and then the client’s component. This is where we could end it if it weren’t for a few nuances.
If the components are being bootstrapped subsequently it could turn out that a component which is needed, hasn’t been created yet on the client’s side. This is a real-life example and as you can probably guess, teasers from the last article. You’re creating something based on microfronted solutions and authorization is done via application in iframe, which is located in the app-component. Continuing – you have a guard, which doesn’t let us pass to the subpage without authorization, which is done through the mentioned iframe. So what happens when initialNavigation is enabled? We don’t have a dedicated page for authorization because we do it in iframe located in a yet non-existent component, we paste a deep link awaiting a login popup and it doesn’t appear because the app component will be bootstrapped after a successful routing initialization and this won’t end successfully because the guard awaits a callback from the popup, which doesn’t appear. Phew – a lot is going on in a closed circle. We have to keep this in mind when developing this type of applications. How can this problem be solved?
Method 1: The easiest way – create a dedicated login page and an adequate service, assuming that that’s not what we expect or at least not exactly.
Method 2: Try the enabledNonBlocking flag. You have to take into account that switching between the server’s and client’s version may be annoying for the user – the application may blink, the scroll position might change – I advise against it.
Method 3: Another process based on the microfrontend approach is the use of custom elements – this topic has already been discussed on our blog. How does it help us? First of all, our authorization component is outside the angular application, so it doesn’t await anything. We can notify the component from the guard level, informing that we want to log in and wait for a response. This solution is definitely worth mentioning, but it requires some work.
Method 4: There is another, in my opinion, the most interesting procedure – using the already mentioned mechanisms, namely the server guard and TransferState. Simple flow:
- In the server-side authorization guard, we save the target route to our state.
- Then we check if our state contains the key on the client’s side, if so, we redirect the user to our waiting room. At this point, the guard completes its operation, so the application is bootstrapped.
12345678910111213141516171819202122@Injectable({providedIn: 'root'})export class SsrRedirectGuard implements CanActivate {constructor(@Inject(PLATFORM_ID) private readonly platformId: unknown,private readonly router: Router,private readonly transferState: TransferState) {}canActivate(route: ActivatedRouteSnapshot, state: RouterStateSnapshot): boolean | UrlTree {const ssrBlockedUrl = this.router.parseUrl(`/${ROUTE_SLUGS.ssrAuth}`);if (isPlatformServer(this.platformId)) {this.transferState.set(ssrRedirectStateKey, state.url);return ssrBlockedUrl;} else {return this.transferState.hasKey(ssrRedirectStateKey) ? ssrBlockedUrl : true;}}} - In the last step – in our waiting room, we retrieve the key value from step 1, delete the entry and redirect back to the address saved in the state.
1234567891011121314151617181920@Component({selector: app-ssr-redirect',template: '<app-loader></app-loader>',styles: [],changeDetection: ChangeDetectionStrategy.OnPush})export class SsrRedirectComponent implements OnInit {constructor(@Inject(PLATFORM_ID) private readonly platformId: unknown,private readonly transferState: TransferState, private readonly router: Router) {}ngOnInit(): void {if (isPlatformBrowser(this.platformId) && this.transferState.hasKey(ssrRedirectStateKey)) {const url = this.transferState.get(ssrRedirectStateKey, null);this.transferState.remove(ssrRedirectStateKey);this.router.navigateByUrl(url);}}}
A little complicated, but it works well in practice. The user won’t notice that something has happened, because he will only see our waiting room on the screen, we don’t have to fiddle with custom elements and all the problems that come with it and we achieve the desired result.
Discovering the issue is difficult or even impossible – you end up spending hours debugging the code, because you can’t find any solutions on the Internet (at least I wasn’t able to). You have to really be aware of Angular to know that something like this can happen.
Summarizing
Today we talked about some not-so-obvious facts and issues. Though investigating TransferState on the internet is pretty simple, digging deeper into the initial state is far more difficult and a description is hard to find anywhere. What’s next in the SSR world? You can expect tips and tricks in the next article – some focusing on the server and the others rather universal.
Leave a Reply