


Introduction
What if we are assigned to a project that is working very well in production, but the technology behind it is considered ‘obsolete’ and we want to replace it? Sometimes it is possible to abandon an old project and start creating a new one instead. If the project is large and the company is making money from it, this may not be possible. The ‘strangler pattern’ comes to the rescue.
It involves rebuilding an old system from the inside out, replacing and adding functionality in it with a different technology instead of the existing one. Over time, the number of such ‘new’ functionalities grows, and we can minimize the old code while keeping the system running continuously. I faced such a challenge when building an administrative application at Unilink, and in the following article I will talk about how I managed to implement micro frontends in Angular.
Preparation
The first step in implementing the new part of the system was to create some new views for the existing application. To solve this task, I decided to use micro front-ends using Web Components. All the new views were separate micro-applications, but used similar code, so they were developed inside a single repository so that I could benefit from the rapid creation and modification of common components. Ultimately, a separate SPA application was to be developed once enough functionality had been achieved in Angular.
I used the Nx tool to create a mono repository. Additionally, in the context of Angular, it extends the CLI with additional capabilities and slightly alters the set of defaults of a newly created Angular project.
Some noticeable differences in a new project created in NX relative to a new project created using the original CLI:
- eslint is added for static code analysis
- Prettier is added for code formatting
- instead of Jasmine and Karma, Jest is added for unit testing
- cypress is added to perform e2e tests
It is also possible to create a project without the above dependencies.
In the monorepo approach, the code of many different libraries and projects is stored in a single repository. NX allows the use of two types of monorepository – integrated (integrated monorepo) and package-based monorepo – which can be combined with each other. Integrated focuses on performance and maintainability. A package-based repository gives greater flexibility and ease of use.
Nx adds a very important command to the CLI – affected, which allows you to list all libraries and projects inside the monorepository that have been affected by changes made compared to a previous or indicated point in git history. Any task can be performed on each item in this list, e.g. lint, tests, build, etc. In addition, NX stores already executed commands in memory and also allows cache synchronisation between multiple workstations (NX Cloud).
Web Components allows you to create your own HTML tag. Such a markup can contain the entire (almost) application in Angular. This is what the Angular Elements library is used for. Each view (feature), can be encapsulated in a separate micro-application. However, Angular in Web Components has a major limitation – it has no support for RouterModule. For navigation between application screens, you have to resort to other solutions. You can find more about Angular Elements here: https://angular.love/en/2021/01/12/angular-elements-2/
Dividing applications into libraries
Nx has a number of different ‘presets‘ to generate a different folder structure. Using the preset for Angular, two main folders will appear in the project: apps and libs.
Apps – contains all the apps that can be built/served. Their configurations are contained in a modified angular.json file that imports them from the project.json files of the individual apps. These can also be applications not written in Angular.
Libs – contains the libraries, or modules, that the applications will use. Their definitions also go into the angular.json file, and the configuration itself is in the project.json file in the folder of the respective library. The library is not a full-fledged application. We can build it and publish it in any repository, such as NPM or private Verdaccio, or use it directly in code. Nx allows very convenient importing of library files via simplified paths (aliases), the configuration of which can be found in the tsconfig.base.json file.
Most of the logic of our application should be in the libs folder. In this way, we can assemble applications from the relevant modules in libraries.
Assembling applications from such modules is very useful if you want to use a particular functionality in more than one application. The entire functionality is encapsulated in a single library. It then goes into the legacy system in a single application – as the Web Component. A second application can be created next to it, which, using routing, displays exactly the same view together with other library based functionalities.
Division of applications into domains
How do you tie it all together and not go crazy?
To keep things in order, we can divide libraries into different business areas and also into different layers. We can call such a business area a domain. This could be, for example, training, payments, orders, a library of shared elements, etc. Each of these domains can be further divided into arbitrary layers. We can use the division proposed by Manfred Steier in https://www.angulararchitects.io/en/aktuelles/tactical-domain-driven-design-with-monorepos/.
- Api
- Feature
- UI
- Domain
- Util
If you want to learn more about layer splitting and how to keep your code tidy, I recommend checking out the NX documentation (https://nx.dev/recipes/other/tag-multiple-dimensions#tag-in-multiple-dimensions and https://blog.nrwl.io/mastering-the-project-boundaries-in-nx-f095852f5bf4 ) and Manfred’s series of articles. In this article I will show you how to use one functionality in two different applications and I won’t go into the details of domain and layer splitting.
Adding the first micro-application
Adding workspace Nx
|
1 |
npx create-nx-workspace@latest |
An interactive wizard will ask us some questions:
|
1 2 3 4 5 6 7 8 9 10 11 12 13 14 |
✔ Workspace name (e.g., org name) · new-system ? What to create in the new workspace … apps [an empty workspace with no plugins with a layout that works best for building apps] npm [an empty workspace with no plugins set up to publish npm packages (similar to yarn workspaces)] ts [an empty workspace with the JS/TS plugin preinstalled] react [a workspace with a single React application] angular [a workspace with a single Angular application] next.js [a workspace with a single Next.js application] nest [a workspace with a single Nest application] express [a workspace with a single Express application] web components [a workspace with a single app built using web components] react-native [a workspace with a single React Native application] react-express [a workspace with a full stack application (React + Express)] angular-nest [a workspace with a full stack application (Angular + Nest)] |
We select angular as the framework and configuration for our project.
|
1 2 |
✔ Application name · invoices ✔ Default stylesheet format · scss |
The last of the questions in the interactive wizard for the new workspace will be
|
1 |
Set up distributed caching using Nx Cloud (It's free and doesn't require registration.) |
Nx offers the possibility to use a cache of executed commands (lint, test, build) in the cloud, which improves the performance of scripts that, in the absence of code changes, will benefit from previously built elements.
Our first application has been added. It will automatically become the default application launched when the npm start command is called with no additional parameters. If you want to change the default application, rename it in the nx.json file
|
1 |
"defaultProject": "invoices" |
For ourproject, each screen (view) of the application should be a separate library. Let’s therefore add a new view – a library that will go into the micro-application – as the Web Component.
Adding feature library
The application that will be the container for our view was already added. Let’s now add the library that will contain the actual view.
|
1 |
nx generate lib feature-invoices –directory billing |
We will be asked which generator we want to use.
|
1 2 3 4 5 |
? Which generator would you like to use? … @nrwl/angular:library @nrwl/workspace:library None of the above |
Select @nrwl/angular:library
A billing folder will be added to the libs folder, which contains the folder with the newly created library. The billing folder in this case is a convention for keeping libraries within a single business domain. It can be any name that represents a business domain. The feature name used is also a convention that can come in handy when adding a division of the application into layers so that they can be easily recognised in the project structure.
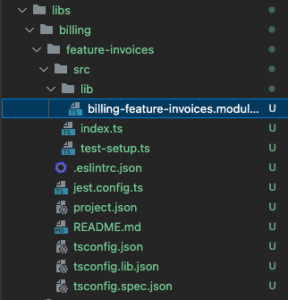
The file worth looking at is index.ts, which exports selected elements from the library, giving access to them from outside the library.
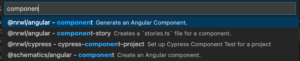
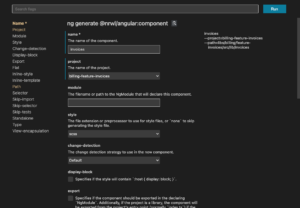
Let’s now add an Angular component to the library, which will be our view. We can use the CLI or any component generation plugin, such as Nx Console.
Remember to add the component in the exports array in the configuration of the module you are adding. This way, we will be able to use this component after importing the BillingFeatureInvoicesModule.
|
1 2 3 4 5 6 |
@NgModule({ imports: [CommonModule], declarations: [InvoicesComponent], exports: [InvoicesComponent], }) export class BillingFeatureInvoicesModule {} |
We can now import the module from the library in the previously created application. Open app.module.ts in the invoices application and import the feature module.
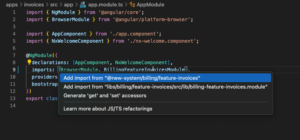
When we enter the module name in the import table and try to import the module automatically, VS Code will suggest two paths to the module. If we choose the absolute path (2nd position), the IDE will immediately highlight it in red. This is eslint and a rule introduced by Nx that protects against this type of import, among other things. We then choose the preferred – first option – import with the path hidden behind an alias, compliant with the npm standard.
|
1 |
import { BillingFeatureInvoicesModule } from '@new-system/billing/feature-invoices'; |
If you want to check all available paths to the libraries, they are configured in the nx.json file in the project root folder.
Now add the component call in the template app.component.html
|
1 |
<new-system-invoices></new-system-invoices> |
Renaming a tag
The generated markup for the Invoices component does not fully reflect what type of component we are dealing with – whether it is a feature or something else. In the file containing the InvoicesComponent, let’s rename the HTML selector to </span><span style="font-weight: 400;">feature-invoices</span><span style="font-weight: 400;">.
|
1 2 3 4 5 6 7 8 |
import {Component } from '@angular/core'; @Component({ selector: 'billing-feature-invoices', templateUrl: './invoices.component.html', }) export class InvoicesComponent {} |
The IDE will show us a warning from eslint:
|
1 |
The selector should start with one of these prefixes: "new-system" (https://angular.io/guide/styleguide#style-02-07)eslint@angular-eslint/component-selector |
We need to change the prefix for the selectors within this library. We go into the .eslintrc.json file in the libs/billing/feature-invoices folder and change the configuration to:
|
1 2 3 4 5 6 7 8 9 10 11 12 13 14 15 16 17 18 19 20 21 22 23 24 25 26 27 28 29 30 31 32 33 34 35 36 |
{ "extends": ["../../../.eslintrc.json"], "ignorePatterns": ["!**/*"], "overrides": [ { "files": ["*.ts"], "extends": [ "plugin:@nrwl/nx/angular", "plugin:@angular-eslint/template/process-inline-templates" ], "rules": { "@angular-eslint/directive-selector": [ "error", { "type": "attribute", "prefix": "feature", "style": "camelCase" } ], "@angular-eslint/component-selector": [ "error", { "type": "element", "prefix": "feature", "style": "kebab-case" } ] } }, { "files": ["*.html"], "extends": ["plugin:@nrwl/nx/angular-template"], "rules": {} } ] } |
However, there is something wrong with such a prefix. Any component declared in this library will have to have a feature prefix, which will not be true. We can adopt, for example, a prefix that is consistent with the name of the domain from which the feature originates, e.g. billing. We then change the configuration again, update our component selector and change the template in our micro application.
|
1 2 3 4 5 6 7 8 9 10 11 12 13 14 15 16 17 18 19 20 21 22 23 24 25 26 27 28 29 30 31 32 33 34 35 36 |
{ "extends": ["../../../.eslintrc.json"], "ignorePatterns": ["!**/*"], "overrides": [ { "files": ["*.ts"], "extends": [ "plugin:@nrwl/nx/angular", "plugin:@angular-eslint/template/process-inline-templates" ], "rules": { "@angular-eslint/directive-selector": [ "error", { "type": "attribute", "prefix": "billing", "style": "camelCase" } ], "@angular-eslint/component-selector": [ "error", { "type": "element", "prefix": "billing", "style": "kebab-case" } ] } }, { "files": ["*.html"], "extends": ["plugin:@nrwl/nx/angular-template"], "rules": {} } ] } |
|
1 2 3 4 5 6 7 8 9 |
import { ChangeDetectionStrategy, Component } from '@angular/core'; @Component({ selector: 'billing-feature-invoices', templateUrl: './invoices.component.html', changeDetection: ChangeDetectionStrategy.OnPush, }) export class InvoicesComponent {} |
|
1 |
<billing-feature-invoices></billing-feature-invoices> |
Building a micro-application as Web Component
The application is only to import the feature module and provide the necessary configuration. Building as the Web Component will require adding a few changes to the default generated files. We will use the instructions from https://angular.love/en/2021/01/12/angular-elements-2/
We add the two necessary libraries:
|
1 |
ng add @angular/elements |
|
1 2 |
Ng add is not natively supported by Nx Instead, we recommend running `npm install @angular/elements && npx nx g @angular/elements:ng-add |
Nx decorates Angular’s CLI by adding functionality under the hood, but as you can see, not all of it. So let’s use the proposed script:
|
1 2 |
npm install @angular/elements npm i @webcomponents/webcomponentsjs // krótsza wersja npm install |
And let’s make changes to the module and component from the invoices application.
apps/invoices/src/app/app.module.ts
|
1 2 3 4 5 6 7 8 9 10 11 |
@NgModule({ declarations: [AppComponent], imports: [BrowserModule, BillingFeatureInvoicesModule], bootstrap: [AppComponent], }) export class AppModule { constructor(injector: Injector) { const el = createCustomElement(InvoicesComponent, { injector: injector }); customElements.define('new-system-invoices', el); } } |
apps/invoices/src/app/app.component.ts
|
1 2 3 4 5 6 7 8 9 10 11 12 13 14 |
import { Component, OnInit } from '@angular/core'; @Component({ selector: 'new-system-root', template: `<div id="container"></div>`, styleUrls: ['./app.component.scss'], }) export class AppComponent implements OnInit { ngOnInit() { document.querySelector('#container')!.innerHTML = '<new-system-invoices></new-system-invoices>'; } } |
Building a Web Component
We serve the application to check that everything works:
|
1 |
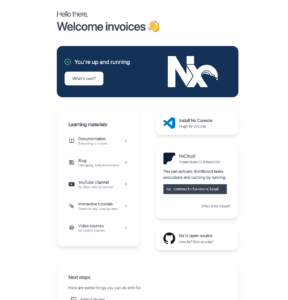
npm start invoices |
Everything works. The hard part comes if we want to have and eat cake, i.e. build an invoices application as a Web Component and still be able to serve it.
According to the article, to enable building micro-applications, we remove the bootstrap configuration from the AppModule decorator.
|
1 2 3 4 5 6 7 8 9 10 11 12 13 |
@NgModule({ declarations: [AppComponent], imports: [BrowserModule, BillingFeatureInvoicesModule], }) export class AppModule { constructor(injector: Injector) { const el = createCustomElement(InvoicesComponent, { injector: injector }); customElements.define('new-system-invoices', el); } ngDoBootstrap() {} } |
Application content has disappeared from our localhost:4200. We will fix this.
We can assume that we will only build the application to Web Component in a production configuration, and otherwise use bootstrapping the application. So let’s use the production field from the environment.ts file in the application.
The ngDoBootstrap hook in the module is always called, even if the application is built to Web Component, so we will move the logic there that will decide what mode to run the application in.
We modify the app.module and the main component code app.component.ts a bit:
apps/invoices/src/app/app.module.ts
|
1 2 3 4 5 6 7 8 9 10 11 12 13 14 15 16 17 18 19 20 21 22 23 24 25 26 27 28 29 30 31 32 33 34 35 36 37 |
const APPLICATION_TAG = 'new-system-invoices'; @NgModule({ declarations: [AppComponent], imports: [BrowserModule, BillingFeatureInvoicesModule], }) export class AppModule implements DoBootstrap { constructor( private _injector: Injector, private _applicationRef: ApplicationRef ) {} ngDoBootstrap(): void { if (environment.production) { try { // prevent 'has already been defined as a custom element' error if (customElements.get(APPLICATION_TAG)) { return; } // create custom elements from angular components const el = createCustomElement(AppComponent, { injector: this._injector, }); // define in browser registry customElements.define(APPLICATION_TAG, el); } catch (err) { console.error(err); } } else { this._applicationRef.bootstrap(AppComponent); } } } |
apps/invoices/src/app/app.component.ts
|
1 2 3 4 5 6 |
@Component({ selector: 'new-system-root', template: `<new-system-invoices></new-system-invoices>`, styleUrls: ['./app.component.scss'], }) export class Ap |
Now that the files have been saved, we should see that our application is working.
What is happening in ngDoBootstrap?
We check that the production flag in the environment file is set to true. We then check whether another component has already been declared in Web Components under the same HTML tag. This can be useful if we are using the same component in more than one place in the static HTML file. We then create an Angular Element by passing the necessary arguments to it and declare the Web Component under the specified tag. However, if the production flag is set to false, we bootstrap the AppComponent into the Angular application.
Let’s see if we can get the application to run as a Web Component. According to Łukasz’s article, we call the build command and merge the files into one.
|
1 2 |
ng build --prod --output-hashing=none cat dist/apps/invoices/runtime.js dist/apps/invoices/polyfills.js dist/apps/invoices/main.js > distjs dist/apps/invoices/main.js > dist/apps/invoices.js |
and we call the Web Component in the static HTML file:
|
1 2 3 4 5 6 |
<body> <script src="../dist/apps/invoices.js"></script> <h1>Static</h1> <new-system-invoices></new-system-invoices> </body> </h |
You can read more about Angular Elements in this blog article https://angular.love/en/2021/01/12/angular-elements-2/
Use of the new feature module in the SPA application
Generating another application in workspace Nx is available under the command:
|
1 |
nx generate app application-with-routing |
At the wizard question in the CLI, we type y in the console:
|
1 |
✔ Would you like to configure routing for this application? (y/N) · true |
In the apps folder, we now have two apps. We can serve the second app (and many others) simultaneously from the same workspace. Just call the script
|
1 |
npm start application-with-routing – –port 4201 –o |
Since port 4200 is already busy, we can manually pass to the command the port on which we want to expose our application. We can also leave it to the CLI to detect another available port without passing this parameter, but then we will get a different port each time.
Let’s add a new application feature to the main app.module.ts, but this time via routing.
|
1 2 3 4 5 6 7 8 9 10 11 12 13 14 15 16 17 18 |
@NgModule({ declarations: [AppComponent], imports: [ BrowserModule, RouterModule.forRoot( [ { path: '', component: InvoicesComponent, }, ], { initialNavigation: 'enabledBlocking' } ), ], providers: [], bootstrap: [AppComponent], }) export class AppModule {} |
When attempting to generate an import path, the IDE will not suggest the correct path this time. Note that all files to be exported from the library must be added to the index.ts file in the corresponding library.
libs/billing/feature-invoices/src/index.ts
|
1 2 |
export * from './lib/billing-feature-invoices.module'; export { InvoicesComponent } from './lib/invoices/invoices.component'; |
We now import the component in app.module.ts. An example of such a routing configuration is very basic. We could use here an additionally created library – Shell – which would contain the needed routing configuration for the entire billing domain. If you want to know how to do this, let me know in the comments.
Now when we open the localhost address with the selected port, we should see the same feature we have in the micro application served on port 4200.
Advantages and disadvantages of Web Component
The use of micro frontends in the form of Web Components has bright and dark sides. Let’s start with the downsides:
- package sizes – despite optimisation, it will still be difficult to achieve small sizes of built micro applications (one way to mitigate the negatives is lazy loading web-components),
- lack of routing – in the context of a web-component, we cannot use router-outlets because our application does not plug into browser addresses. Such a micro-application is dependent on the parent navigation. We can of course use standard anchor tags instead of routerLinks,
- Over time, DevOps may be needed – splitting into multiple libraries increases the time to go through the build process. Linting, testing and building the entire project can extend to minutes (if not hours). Monorepo will need to introduce some optimisations in the CI/CD process, e.g. using the
affectedcommand and caching.
Advantages
- we get the possibility to gradually create new system functionalities, moving the legacy system into maintenance mode only,
- when using a session in a cookie, the Web Component does not need to have its own authorisation. All actions are performed in the context of the parent, i.e. the system in which our Web Components are embedded. It is the parent that “borrows” the session,
- migration to SPA applications from Legacy is relatively straightforward, if the coverage of the system’s functionality is large enough. We need to add a separate application – a shell – to manage routing, authorisation and other details that Web Components didn’t have to worry about.
Summary
Micro frontend architecture can be useful not only in large, distributed teams. It can also be used for incremental redevelopment of an existing system. Dividing an application into modules will make our code easier to maintain, but it is important to remember that it is not a solution that will magically make modifying code easier. If we take care of good practices, adding new functionality will become faster through increased reuse of existing code between functionalities / projects.
P.S. Speaking of large package sizes with Web Components. Currently our micro application that only displays the text invoices works! has a size of 226 kB. This is far too much! If you need something smaller, it is worth considering creating web components without using frameworks. You may encounter this approach for example in Google Material v3 (https://m3.material.io/develop/web).
Leave a Reply