The size of your application bundle significantly affects user experience. With so many libraries available in npm, it’s easier than ever to ruin the application’s performance by bloating its bundle size. This article explores precisely that: the importance of your bundle size, how to measure it correctly, and some common optimization strategies.
What Is the Bundle Size?
The bundle size refers to the total compiled size of your application’s code. Angular components, styles, libraries, dependencies — all of these have an impact on your application. As you add more and more features, your bundle size will increase accordingly. After a certain point, it will require optimizing.
Why Is the Bundle Size Important?
Reducing your application’s bundle size can significantly decrease its loading time. A smaller app directly corresponds to faster loading speeds. This is crucial for landing pages, e-commerce sites, and more. Additionally, it has an impact on your website’s SEO.
The business implications are profound. A case study from Google indicates a 32% increase in bounce probability as the page load time increases from 1 second to 3 seconds. Similarly, the BBC reported a 10% increase in user departure likelihood for every additional second of load time.
The conclusion is clear: a minimal bundle size is essential in retaining new users, especially on slower networks.

How To Analyze the Bundle Size?
The bundle size can be analyzed using bundle size analyzers — tools that generate charts or reports detailing the impact of various files on your application’.
Here are some popular analyzers:
Lighthouse Treemap (development)
This tool is integrated into Chromium-based browsers. Lighthouse Treemap is user-friendly, requiring no external dependencies in your application. A standout feature of this tool is its ability to display the amount of JavaScript that remains unused, which makes it a perfect tool for analyzing the initial bundle size while on the development server.
Webpack-bundle-analyzer (production)
This is a npm library visualizing your webpack bundle size on an interactive, zoomable treemap. I included this tool here because it’s not a suggested tool for analyzing bundle size in angular applications. Webpack-bundle-analyzer, while useful and extremely popular, has several drawbacks: can increase app build time, may be complex to set up and is not perfectly accurate. For deeper understanding, I recommend checking out a tweet by Minko’s, Angular tech lead, or exploring this specific Github issue.
Source-map-explorer (production)
Npm library, source-map-explorer analyzes the bundle size via source maps, mapping bytes in minified code back to their source files. It’s the best choice for Angular, in my opinion.
Live-Coding Session!
In this session, we will develop a sample application utilizing the Angular Font Awesome icons library and analyze its bundle size with source-map-explorer. Although it may seem simple, it’ll get more complicated over time.
Project Setup:
Generate a new application using Angular CLI 17.2.0
ng new Playground --standalone --style=scss --ssr=false --routing=falseOpen the project in the IDE of your choice and remove the contents of app.component.html. Then, remove the title property in app.component.ts.
Adding source-map-explorer
In this project, we’ll use source-map-explorer — a tool for analyzing production builds. Operating on the application’s build requires us to add a custom configuration to angular.json.
Source-map-explorer requires the following options to generate a precise bundle size treemap:
-
- Source Maps — Generates source maps for scripts and styles, ensuring each JavaScript file has a corresponding .js.map file . For example, main.js will have a corresponding main.js.map file. You can learn more by reading the Angular documentation.
- Output Hashing — Defines the output filename cache-busting hashing mode. With this setting set to “none”, files in the bundle won’t have a hash suffix, so main.js won’t have its name changed to something like main-5R55YYTO.js in the final bundle.
- Named Chunks — Use file names for lazy loaded chunks. This setting, while set to true, will ensure our lazy loaded file will be named feature-file-3DXD2T2D.js instead of chunk-Q6M2GG4B.js. This option is useful for analyzing bundles with lazy-loaded features.
Let’s add an additional configuration for our application using the options we just discussed.
`angular.json`
"configurations": {
 "production": { ... },
 "analyze-bundle": {
   "sourceMap": true,
   "outputHashing": "none",
   "namedChunks": true
 },
 "development": { ... }
},
We’ve now configured the Angular build process. Next, add the source-map-explorer library to our project with the development dependency flag.
npm i -D source-map-explorerYou can now analyze your application’s bundle size with the source-map-explorer command. You can learn more about the command in the documentation.
I recommend adding a script to your npm configuration when working with external commands for several reasons:
- Other developers will see it immediately when opening package.json.
- You don’t need to memorize the command.
- It allows you to run the script directly through your IDE’s GUI or CLI without specifying extra options.
Let’s add the analyze-bundle command to our npm package.json configuration:
`package.json`
"scripts": {
 "analyze-bundle": "ng build --configuration=analyze-bundle && source-map-explorer dist/**/*.js --no-border-checks"
},
You can now run the script with the command:
npm run analyze-bundleIgnore the Unable to map X/X bytes (X%) warnings if they don’t exceed more than 5% of your file size. After executing the command, a new tab should open in your browser, containing a treemap visualization of your application.

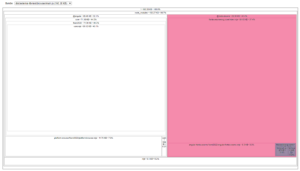
How to Use and Read Bundle Size Treemaps
Using treemaps is very simple. In the top left corner, you can select a file to view. Here, we have a 2 options to choose from:
- main.js — the file containing the initial bundle of your application
- polifills.js — the file with code that ensures that your web application works consistently across different browser versions.
As you begin lazy-loading or using @defer in your application’s code, more files will become selectable. Now, let’s move on to the treemap’s rectangles — outlined in black. They contain two pieces of information:
- File/Folder name (e.g. node_modules, main.js or core.mjs).
- File/Folder bundle size in KB and as a percentage of the selected file or combined bundle size.
Clicking on a rectangle focuses on its children. It’s useful for analyzing dependencies in large applications. The bigger the rectangle is, the more impact on your bundle size it has.
Enough theory. Let’s look at the initial bundle size of our app, 77.43KB. Remember that value for later comparison.
Modifying the Project — Adding a Third Party Dependency
As of this writing, the @fortawesome/angular-fontawesome library serves as a great example of why you should analyze the bundle size of your application after downloading each external dependency. This library is a popular choice among developers — it has over ~200k weekly downloads.
Let’s get back to our IDE and add fortawesome to our project.
ng add @fortawesome/angular-fontawesome@0.14.1
During the installation choose the following icon packs:
- Font Awesome 6
- Free Solid Icons
We’re ready to use the <fa-icon/> component in our project. Let’s start by declaring FaIconComponent in the component’s imports array. Then import and assign the faClose icon to a property in the AppComponent. Note that you can import icons from two paths:
- @fortawesome/free-solid-svg-icons
- @fortawesome/free-solid-svg-icons/faClose — we’ll use this import initially
`app.component.ts`
import { Component } from '@angular/core';
import { faClose } from "@fortawesome/free-solid-svg-icons/faClose";
import { FaIconComponent } from "./fa-icon/fa-icon.component";


@Component({
 selector: 'app-root',
 standalone: true,
 imports: [FaIconComponent],
 templateUrl: './app.component.html',
 styleUrl: './app.component.scss'
})
export class AppComponent {
 protected readonly faClose = faClose;
}
As the final step use the <fa-icon/> tag in the component’s template.
`app.component.html`
<fa-icon [icon]="faClose" />Analyzing the Bundle After Adding an External Dependency
It’s time to review the application’s bundle size. Let’s run the analyze-bundle script.
npm run analyze-bundleYou should see a treemap visualization, but without colors. (select main.js)
The bundle size almost doubled since the previous check. I’ve marked the additional bundle items in magenta and purple for clarity. Clearly, something is wrong with our bundle size.
This example, while trivial, still showcases the potential pain points in managing a reasonable bundle size. Real world scenarios involve dozens of dependencies, but the principle remains the same: find the biggest rectangles and analyze them.
While working on bundle size analysis, it’s worth documenting your findings. It’ll allow you to create action points with different optimization priorities . Speaking of which…
How to Reduce the Bundle Size?
There are several strategies to optimize your bundle size:
- Lazy-load modules and components that are not required on the initial load
- Use the new @defer syntax in component templates. (Remember that it impacts SEO)
- Utilize TypeScript’s dynamic import expressions to lazy-load code on demand. This pattern is commonly used with dialog boxes.
- Replace external libraries with your own light-weight implementations.
- Remove or relocate styles from global styles (styles.scss) to the components
- Use standalone components or the SCAM architecture (for Angular versions below 14.0.0) to take advantage of tree-shaking and remove unused components from your bundle.
- Remove all dead code from your application, including unused services, directives, pipes, modules, and so on. Additionally, remove unused dependencies and libraries from your bundle.

Reducing the Bundle in Our Application
Let’s analyze the file size of our app once more. Adding the Font Awesome library resulted in 82.95KB added to our initial bundle size. Currently our app weighs 160.38KB in total — almost as much as the Angular initial bundle size!
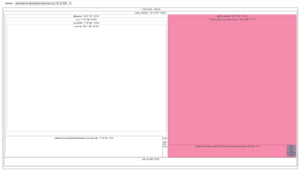
We’ll start optimizing with an easy fix. As you can see from the purple rectangles in the treemap, importing the faClose icon resulted in the faXMark icon being added to our bundle, even though we’re not using it. We can update the import from:
import { faClose } from "@fortawesome/free-solid-svg-icons/faClose";to:
import { faClose } from "@fortawesome/free-solid-svg-icons";Now run the analyze-bundle script again.
We improved our bundle size by 1.12KB – we decreased the main.js file size from 160.38KB to 159.26KB. That’s definitely an improvement — but still not a noticeable optimization.
Let’s dive deeper into the problem and focus on the fontawesome-svg-core/index.mjs rectangle. This is a significant item of our bundle size, weighing in at 60.03KB! My initial guess is that the Font Awesome component includes features we don’t use that result in extra KB added to our bundle.
After investigating the GitHub repository and documentation, it’s clear that there are many more features than we use in our app. There are two possible solutions: either we wait for the Font Awesome plugin to become optimized and more tree-shakable, or we try other optimization techniques.
After reviewing the How to reduce the bundle size? section, it seems we have two options to reduce the initial bundle size of our app:
- Use the @defer block and lazy load our components. We’re not going to use this approach as it might impact the page’s SEO and it doesn’t address the root of the problem — the component will still be loaded, eventually.
- Write our own implementation of a fa-icon component based on font-awesome library API. This solution seems better — but it’s much more challenging. Still, I decided to give it a try.
Writing a Custom Implementation of Font Awesome
Though re-writing components offers long-term flexibility and performance benefits, it’s full of challenges. One of them is accessibility — keyboard navigation, ARIA attributes, translations, implementing testing harnesses and other APIs. Oftentimes, you’ll find yourself sifting through documentation, source code, issues, and pull requests. Consequently, creating a project-oriented version of an external component may be time-consuming.
Therefore, I will not document my research on the Font Awesome icons in detail. Instead, I aim to demonstrate what’s possible when you’re committed to optimizing your bundle size.
Let’s start our custom implementation by generating the component
ng g faIcon --inline-style --inline-template --skip-testsThen modify the fa-icon.component.ts as follows:
`fa-icon.component.ts`
import { Component, computed, inject, input, ViewEncapsulation } from '@angular/core';
import { IconDefinition } from "@fortawesome/free-solid-svg-icons";
import { DomSanitizer, SafeHtml } from "@angular/platform-browser";


/**
* Code based on https://github.com/FortAwesome/react-fontawesome/issues/232#issuecomment-1158654385
*/
@Component({
 selector: 'app-fa-icon',
 standalone: true,
 template: ``,
 host: {
   '[innerHTML]': 'iconHtml()',
 },
 styles: `
   .svg-inline--fa {
     display: inline-block;
     height: 1em;
     overflow: visible;
     vertical-align: -0.125em;
   }
 `,
 encapsulation: ViewEncapsulation.None
})
export class FaIconComponent {
 icon = input.required<IconDefinition>()
 iconHtml = computed(() => this._createIconHtml(this.icon()))


 private readonly _sanitizer = inject(DomSanitizer);


 private _createIconHtml(faIcon: IconDefinition): SafeHtml {
   const [width, height, , , svgPathData] = faIcon.icon;


   const iconHtml = `
  <svg aria-hidden="true" focusable="false" class="svg-inline--fa" viewBox="0 0 ${width} ${height}" xmlns="http://www.w3.org/2000/svg" role="img">
     <path fill="currentColor" d="${svgPathData}" />
   </svg>`


   return this._sanitizer.bypassSecurityTrustHtml(iconHtml);
 }
}
Here’s an explanation of the above code:
- The required icon input is the core of the component. It uses the IconDefinition type that comes from the font-awesome library.
- Based on that signal we create the iconHtml, which transforms the input value to the icon svg with the use of the _createIconHtml method.
- Lastly we display the sanitized html inside the [innerHTML] property in the component’s host. We also include some styling for the icon.
As you can see, the code responsible for rendering of the icon is straightforward. What about using our custom implementation in other components? Let’s try it!
`app.component.ts`
import { Component } from '@angular/core';
import { faClose } from "@fortawesome/free-solid-svg-icons/faClose";
import { FaIconComponent } from "./fa-icon/fa-icon.component";


@Component({
 selector: 'app-root',
 standalone: true,
 imports: [FaIconComponent],
 templateUrl: './app.component.html',
 styleUrl: './app.component.scss'
})
export class AppComponent {
 protected readonly faClose = faClose;
}
`app.component.html`
<app-fa-icon [icon]="faClose" />
When it comes to usage there is almost no difference between our custom implementation and the official library! For convenience we could even update the component’s selector to fa-icon.
Is this custom implementation perfect for you? Of course that depends, but in case you’re not using extra component functionalities (Personally, I’ve never used them) or even the utility classes (e.g. you use tailwind instead) this solution seems ideal.
What about the bundle size? Did we achieve our optimization goal? Let’s run the analyze-bundle script. (select main.js)
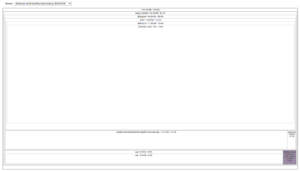
Indeed, we reduced the bundle size from 158.27KB to 94.64KB. This represents a significant gain in terms of bundle size (you can see our progress on the chart in the final analysis below). While this coding our application process may seem swift, achieving similar results in reality might require days or even weeks of research and implementation.
Disclaimer:
Note that our custom “fa-icon” component is not visible in the treemap chart because it does not have sufficient weight to be displayed. In cases involving larger components, you would see them within the /src rectangle.
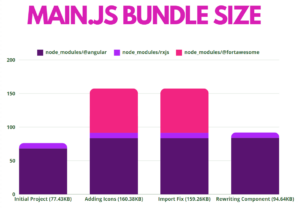
Final Analysis of Bundle Size
As a concluding segment of this article, let’s analyze the main.js bundle size. I have prepared a chart detailing each step we’ve taken in our application:
- (1) Initial Project – Bundle size measurement right after creating a fresh Angular project.
- (2) Adding Icons – Bundle size measurement immediately after adding and utilizing the @fortawesome/angular-fontawesome library in our project. Noticeably, our bundle size sky-rocketed.
- (3) Import Fix – Bundle size measurement following the correction of the icon import. Although we saw some improvement, it wasn’t a significant change that would impact user experience.
- (4) Rewriting Component – Bundle size measurement after implementing our own fa-icon component. As you can see we made great progress – the @fortawesome disappeared from the treemap, as icon svg code weight is almost symbolic.
Conclusions
As demonstrated, the initial bundle size is a crucial performance metric for your applications. Bundle size analyzers tools can assist in analyzing bundle size for both development and production builds. It’s good practice to measure the bundle size regularly and, more importantly, to review it after integrating new libraries into the project. This practice can prevent unnecessary performance optimization efforts in the long run. You may also consider setting a budget for your initial bundle size and component styles to maintain performance standards effectively.