How to implement automatic token insertion in requests using HTTP interceptor
The mechanism of HTTP interceptor was introduced in Angular version 4.3 as a part of HTTPClientModule. The main purpose of the interceptor to capture and modify HTTP requests and responses.The interceptor can help with a variety of tasks: using in authorization processes by adding a token for the request, changing headers, modifying response from server, retrying failed requests, caching and many other common tasks. This article will give you a pretty good overview of the most common cases where interceptors are used.
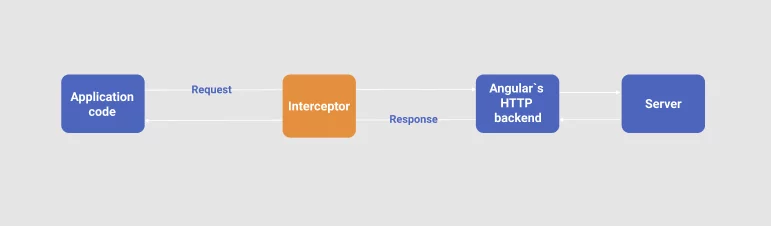
An interceptor sits between your application code and Angular’s HTTP backend that sends AJAX requests to a server. The following diagram demonstrates this:
You can learn more about internal implementation of interceptors in Insider’s guide into interceptors and HttpClient mechanics in Angular.
Authentication is one of the most common use cases for using an interceptor. In this guide I’ll show you how to implement an interceptor to handle tokens in the authentication process.
Suppose, we have the following service used in authentication that stores and reads tokens from localstorage:
import { Injectable } from '@angular/core';
@Injectable()
export class AuthService{

 constructor() { }

 getAuthToken():string {
 return localeStarage.getItem('token')
 }
}
In Angular an interceptor has a form of TS class that implements HttpInterceptor interface.
According to Angular documentation HttpInterceptor interface has one crucial method – intercept – that identifies and handles a HTTP request.
interface HttpInterceptor {
 intercept(req: HttpRequest<any>, next: HttpHandler): Observable<HttpEvent<any>>
}
req– the outgoing request object to handle.next– the next interceptor in the chain, or the backend if no interceptors remain in the chain.Observable– the intercept method returnsObservable<HttpEvent<any>>. An observable of the event stream. You can handle this Observable due to your future functionality of your application.
Let’s create an AuthInterceptorService and add authorization headers:
export class AuthInterceptorService implements HttpInterceptor {
  constructor(private authService: AuthService) {}
 intercept(request: HttpRequest<any>, next: HttpHandler): Observable<HttpEvent<any>> {
    const token = this.authService.getAuthToken();

   if (token) {
     // If we have a token, we set it to the header
     request = request.clone({
        setHeaders: {Authorization: `Authorization token ${token}`}
     });
  }

  return next.handle(request).pipe(
  	catchError((err) => {
   	 if (err instanceof HttpErrorResponse) {
       	 if (err.status === 401) {
       	 // redirect user to the logout page
     	}
 	 }
  	return throwError(err);
	})
   )
  }
}
As you can see the intercept method is responsible for modifying the HttpRequest object. So, we take our token from authService. If we do not have any token, we set the header for our request.
Note that HttpRequest is an immutable object, so we can not modify it directly. Immutability of HttpRequests in Angular gives certain guarantees best described in this article . The clone method of HttpRequest allows us to modify the specific properties of the request not modifying it but coping.
After modifying HttpRequest we call the handle method on HttpHandler with the HttpRequest object (which was successfully cloned). For handling errors we are using the catchError operator from RxJS. You can read about this operator in the reference. Do not forget to return an observable – throwError(err) from the catchError function. So, after verifying the error instance we can implement some additional logic – check the status of the error and redirect the user to the logout logout page.
In our case, the handle method sends the request to the backend server or in another case it could invoke the next interceptor.
The last bit that’s left is to add AuthInterceptorService and AuthInterceptorService to the AppModule.
import {HTTP_INTERCEPTORS } from '@angular/common/http';
import { AuthInterceptorService} from '...';
import { AuthService} from '...';
@NgModule({
 ...
 imports: [
  HttpClientModule,
  ...
 ],
 providers: [
   AuthService ,
  {
   provide: HTTP_INTERCEPTORS,
   useClass: AuthInterceptorService,
   multi: true
  },
  ...
 ],
 ...
})

export class AppModule { }
In case if you are going to use multiple interceptors you should define them in the next way:
import {HTTP_INTERCEPTORS } from '@angular/common/http';
@NgModule({
 ...
 imports: [
  HttpClientModule,
  ...
 ],
 providers: [
   FruitService,
  {
   provide: HTTP_INTERCEPTORS,
   useClass: FirstInterceptor,
   multi: true
  },
  {
   provide: HTTP_INTERCEPTORS,
   useClass: SecondInterceptor,
   multi: true
  },
  ...
 ],
 ...
})

export class AppModule { }
It is important to mention that interceptors will be called in the order in which they were provided. When you set optional attribute multi as true, it tells Angular that the provider is a multi provider – we can provide multiple values for a single token in DI. The bunch of interceptors can also create a chain which is related to each other. How to implement a custom middleware chain you can read here.
Summary:
The HttpInterceptor in Angular is a very useful mechanism that provides valuable functionality – managing request or response. In the intercept method you can use immutable principles for changing request or response.
Handling your request/response can solve a lot of problems such as error handling, authentification, adding custom headers to the outgoing request, logging the incoming response, etc.
If you’re curious to learn more about interceptors, check out the following articles.
References:
How to split http interceptors between multiple backends
Insiders guide into interceptors and httpclient mechanics in angular