

Angular + Vercel
If you’re just getting started with Angular, you’d certainly like to be able to share your projects externally. In the official documentation, we can find several ways to deploy applications using services like Firebase, Github Pages or Netlify. Each of the mentioned services has its own process for deploying applications. In an upcoming series of articles, we will examine some of them. Today we will take one of the options under the microscope, which is Vercel.
Vercel
Experience the power of Vercel for deploying dynamic web applications! Dive into exciting functionalities analyzed below. While Next.js is a highlight, Vercel effortlessly deploys applications in various technologies, including Angular. Embrace Vercel’s free Hobby Plan—perfect for fueling the passion in your side projects!
Development
At the very beginning, let’s generate a new application using Angular CLI. Instead of the standard npm, I will use pnpm as a package manager. Pnpm is an alternative to npm that offers us faster package installation and better performance. When deploying applications later, we will care about build time, so this is clearly an advantage. We can do this by adding the flag --package-manager={npm|yarn|pnpm|cnpm} to our command.
|
1 |
ng new ng-vercel-app --package-manager=pnpm |
Deploy with Vercel CLI
Project created. To deploy our Angular project on Vercel, we can connect our application to a repository on popular platforms such as Github or using the Vercel CLI. Connecting a remote repository is fully sufficient for the platform’s basic use.. We install Vercel CLI as a global package in pnpm.
|
1 |
pnpm i -g vercel |
After installation, we can verify if the package has been installed correctly.
|
1 2 |
$ vercel --version > Vercel CLI 28.15.6 |
Vercel CLI installed, we can now proceed to deploy our Angular application. From the root directory, we run the </span><span style="font-weight: 400">vercel command, which will launch our project’s configurator on the platform. If we have never used Vercel CLI before, we will be prompted to log into our account.
|
1 2 3 4 5 6 7 8 9 10 11 12 13 14 15 16 17 18 19 |
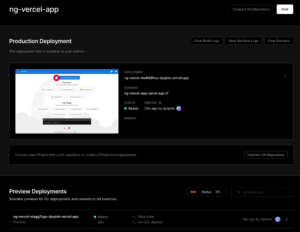
$ vercel > Vercel CLI 28.15.6 > ? Set up and deploy “~/projects/ng-vercel-app”? [Y/n] y > ? Which scope do you want to deploy to? dyqmin > ? Link to existing project? [y/N] n > ? What’s your project’s name? ng-vercel-app > ? In which directory is your code located? ./ > Local settings detected in vercel.json: > Auto-detected Project Settings (Angular): > - Build Command: ng build > - Development Command: ng serve --port $PORT > - Install Command: `yarn install`, `pnpm install`, or `npm install` > - Output Directory: dist > ? Want to modify these settings? [y/N] n > ? Linked to dyqmin/ng-vercel-app (created .vercel and added it to .gitignore) > ? Inspect: https://vercel.com/dyqmin/ng-vercel-app/HJMawZjUPo5NUD4PjVeHLYTttZgY [1s] > ✅ Production: https://ng-vercel-app.vercel.app [49s] > ? Deployed to production. Run `vercel --prod` to overwrite later (https://vercel.link/2F). > ? To change the domain or build command, go to https://vercel.com/dyqmin/ng-vercel-app/settings |
As you can see, Vercel automatically detected our application as an Angular application and initiated the configuration from a ready-made preset. In the outfile, we got links to our application production environment and a link to our project on Vercel.
First Deployment
Now let’s make a simple change in the code and see what the process of deploying the application looks like using the </span><span style="font-weight: 400">vercel deploy command.
|
1 2 3 4 5 |
$ vercel deploy > Vercel CLI 28.15.6 > ? Inspect: https://vercel.com/dyqmin/ng-vercel-app/8PkfJv7MvqKwKuDz5kYi6sCFF6BYw [4s] > ✅ Preview: https://ng-vercel-app-dyqmin.vercel.app [31s] > ? To deploy to production (ng-vercel-app.vercel.app), run `vercel --prod` |
Vercel for each deployment creates a preview environment for us to test before deploying to production. We can check the changes through the visual preview and then flip them to the production environment, as prompted by the CLI above. To do this, just call the </span><span style="font-weight: 400">vercel --prod command.
Connecting to a repository on GitHub
In the previous step, we connected a local Angular application to Vercel. It is worth mentioning that Vercel offers us the possibility to deploy the application directly from a repository on popular platforms such as GitHub, GitLab, or Bitbucket, which is definitely a more convenient solution. We navigate to the newly created project in the panel on the Vercel website.
At the top, we have a button that will take us to the project settings along with a list of available repositories of the account we have associated with Vercel.
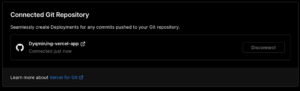
From now on, any push to the repository will trigger an automatic application deployment process.
Comments
As we can see, the deployment of the Angular application on Vercel is fabulously simple. After entering the preview url, we can see an additional static panel at the bottom section of our page.
It is a platform-dedicated overlay that allows us, among other things, to post comments by pinning them to a particular section of the page. It is a great tool for discussing and sharing comments with the team. Also, It is fully interactive – we can tag other users, create threads and get notifications. For the free hobby plan, it can be useful as a note-taker. If the panel bothers us in any way, we can hide it or fully disable this feature in the settings.
Vercel Integrations
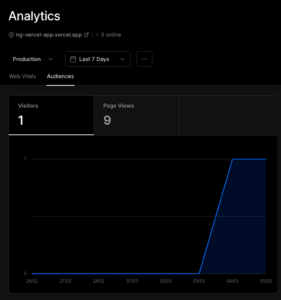
Ready-made integrations link to various external and internal services and tools. Choose from popular tools for monitoring, analytics, CMS, and more. The list of integrations is growing, and your favorite tool may be added soon! Explore integrations at https://vercel.com/integrations. For my Angular project’s first integration, I’ll add Vercel Analytics. Currently in Beta, it’s free, but this may change. Enable Analytics in the project’s main panel under the “Analytics” tab. Configure Web Vitals or Audiences; we’ll focus on the “Audiences” tab. It’s like a simplified Google Analytics, providing basic metrics like page hits, sources, and visitors. Launch the module with the “Enable” button.
Adding Analytics to Angular application
We need to start counting statistics by installing the official package:
|
1 |
pnpm install @vercel/analytics |
Now, we only need to add a function that initializes the analytics script in the bootstrap process of our application. So we add the appropriate piece of code to our application in the </span><span style="font-weight: 400">main.ts </span><span style="font-weight: 400">file .
|
1 2 3 4 5 6 7 8 9 10 11 12 13 14 15 16 17 18 19 20 |
import { APP_INITIALIZER, isDevMode } from "@angular/core"; import { bootstrapApplication } from "@angular/platform-browser"; import { provideRouter } from "@angular/router"; import { inject } from "@vercel/analytics"; import { AppComponent } from "./app/app.component"; import { routes } from "./app/routes"; bootstrapApplication(AppComponent, { providers: [ provideRouter(routes), { provide: APP_INITIALIZER, useFactory: () => { inject({ mode: isDevMode() ? 'development' : 'production' }) } } ] }) .catch(err => console.error(err)); |
After serving the application, we’ll see logs in the console with the prefix [Vercel Analytics] for debugging events fetched by the script. Debugging is enabled automatically if the </span><span style="font-weight: 400">NODE_ENV environment variable has the value </span><span style="font-weight: 400">development or </span><span style="font-weight: 400">test , however, we can disable it by adding the appropriate flag in the inject props:
|
1 |
inject({ debug: false }) |
In addition, we can see that the function has added a Vercel script to the document at the end of the head:
|
1 |
<script src="https://cdn.vercel-insights.com/v1/script.debug.js" defer="" data-sdkn="@vercel/analytics" data-sdkv="0.1.11"></script> |
This means that everything works as it should! We can commit, push and test the deployment! After testing the production link, we return to the panel, and we can confirm that the analytics data is collected correctly.
Analytics is one of the basic integrations, we will come back to others ?
Serverless Functions
Vercel offers to create serverless functions from the project level, which will be automatically mapped and deployed with app deployment. In a moment, we will check how simple the process of creating them is.
In the free Hobby plan, we can create a maximum of 12 functions. We also get a maximum execution time limit of 10 seconds.
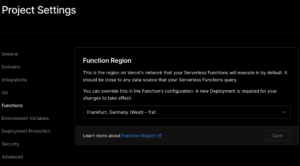
For faster response time from our features, let’s check the deployment region in the project settings in the panel. I had the default location set from the United States, so I’m changing it to Frankfurt, which is the closest to me.
The fun with Vercel functions starts with installing some packages. These will be type definitions.
|
1 |
pnpm install -D @vercel/node @types/node |
Create an ‘api’ folder in the main directory. Any *.js/*.ts file becomes a serverless function, mapped to a path matching the file’s path. For instance, ‘cats.ts’ yields an endpoint at ‘/api/cats’. ‘index.ts’ in a folder, like ‘dogs’, makes the endpoint path ‘/api/dogs’.
First Endpoint
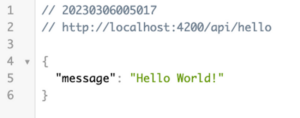
So let’s create our first endpoint in a file named hello.ts. As a reminder, it will be mapped to the /api/hello path.
|
1 2 3 4 5 6 7 |
import { VercelRequest, VercelResponse } from "@vercel/node"; export default function (request: VercelRequest, response: VercelResponse) { response.status(200).send({ message: 'Hello World!', }); }; |
A request and response are passed to the function, allowing us to access cookies, query parameters and other properties of the </span><span style="font-weight: 400">Request interface. In like manner, we would create an endpoint in a library like express.js. As we can infer from the code, we mutate the response by returning a status of 200 along with the response in the form of an object with a ‘message’ field.
Typescript Configuration
To avoid compilation errors of typescript files, let’s add tsconfig.json inside the api folder.
|
1 2 3 4 5 6 7 8 9 10 11 12 13 14 15 16 17 18 19 20 |
{ "compilerOptions": { "target": "ES2015", "module": "CommonJS", "moduleResolution": "node", "lib": [ "ES2020", ], "strict": true, "noImplicitAny": true, "strictNullChecks": true, "strictFunctionTypes": true, "strictBindCallApply": true, "strictPropertyInitialization": true, "noImplicitThis": true, "alwaysStrict": true, "esModuleInterop": true, "types": ["node"] }, } |
Ng serve alone can’t handle our function; Angular builder lacks awareness of the api directory. Enter Vercel CLI’s dedicated local server! Mimic serverless functions seamlessly with vercel dev command, defaulting to port 3000. Easily switch to port 4200 using the listen argument.
|
1 |
vercel dev --listen 4200 |
Testing API Route
After launching, let’s go to localhost:4200/api/hello to check if our endpoint is working.
Great! Now, let’s link our angular application to a function using a new angular service.
|
1 2 3 4 5 6 7 8 9 10 11 12 13 14 |
import { inject, Injectable } from '@angular/core'; import { HttpClient } from '@angular/common/http'; import { map, Observable } from 'rxjs'; @Injectable() export class ApiService { private readonly _http = inject(HttpClient); getMsg(): Observable<string> { return this._http.get<{ message: string }>('/api/hello').pipe( map((res) => res.message), ); } } |
To test the service, I created a new component in which I trigger the request with an async pipe.
|
1 2 3 4 5 6 7 8 9 10 11 12 13 14 |
import { Component, inject } from '@angular/core'; import { ApiService } from './api.service'; import { AsyncPipe } from '@angular/common'; @Component({ selector: 'app-home', template: `{{ msg$ | async }}`, imports: [AsyncPipe], standalone: true, }) export class HomeComponent { private readonly _apiService = inject(ApiService); readonly msg$ = this._apiService.getMsg(); } |
We can now test it in the browser!
Dynamic paths
Above, I described the mechanism of file mapping, but I did not mention a very useful feature, which is dynamic paths. Files and folders, whose name is between square brackets, are interpreted as a dynamic path. This means that it will accept any string of characters. I will create a [name].ts file that retrieves a string from a URL at the location designated for it:
|
1 2 3 4 5 6 7 |
import { VercelRequest, VercelResponse } from "@vercel/node"; export default function (request: VercelRequest, response: VercelResponse) { response.status(200).send({ message: 'Hello World!', }); }; |
In the express.js library, we would create a similar endpoint this way:
|
1 2 3 |
app.get('/:name', (req , res) => { // implementation }); |
We can create paths by creating multiple dynamic fragments in the file tree. Our directory structure might look like this, for example:
|
1 2 3 4 5 |
api/ └── users/ └── [userId]/ └── posts/ └── [postId].ts |
As in the example above, dynamic fragments will be passed as a query.
|
1 2 3 4 5 6 7 8 9 10 11 12 13 14 15 |
export default function (request: VercelRequest, response: VercelResponse) { const { userId, postId } = request.query; if (!userId || !postId) { response.status(400).send({ message: 'Missing parameters', }); return; } response.status(200).send({ userId, postId, }); }; |
Caching
In order to optimize function execution time, we can cache the returned responses. This requires setting the </span><span style="font-weight: 400">Cache-Control header. Vercel recommends setting two specific directives in the header to control the mechanism in its infrastructure while forcing the browser to skip remembering the response.
The correct value should be </span><span style="font-weight: 400">max-age=0 , s-maxage=86400, where </span><span style="font-weight: 400">86400 is the number of seconds conditioning how long the response should be cached for.
For our current function to return a welcome message, the code would look like this:
|
1 2 3 4 5 6 7 8 9 10 11 |
import type { VercelRequest, VercelResponse } from '@vercel/node'; export default function (request: VercelRequest, response: VercelResponse) { const { name = 'World' } = request.query; response.setHeader('Cache-Control', 'max-age=0, s-maxage=86400'); response.status(200).send({ message: `Hello ${name}!`, }); }; |
Environment Variables
When creating API routes, we may need to add dedicated environment variables. We can add them in the panel or through the command:
|
1 2 3 4 5 |
$ vercel env add FINANCE_API_KEY > Vercel CLI 28.16.12 > ? What’s the value of FINANCE_API_KEY? XXX > ? Add FINANCE_API_KEY to which Environments (select multiple)? Production, Preview, Development > ✅ Added Environment Variable FINANCE_API_KEY to Project ng-vercel-app [749ms] |
When adding an env variable, we can mark to which environments it should be applied. This is a great option if, for example, you have different versions of services, and the keys for them differ depending on their own environment.
Environment variables will not be passed in the process of building an angular application. If we would like to use them in the application, we can do it through additional webpack configuration, which was brilliantly presented by our colleague Fanis on his YT channel: https://www.youtube.com/watch?v=7ljEz52zdUM.
If we decide to add envs through the panel, we can pull them locally through the command:
|
1 |
vercel env pull |
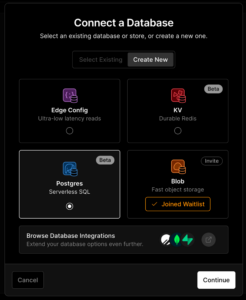
Databases
Vercel recently added integrations with their own database service. As a result, we can easily access it in our API routes. The Postgres service is currently in Beta, so a lot could have changed since the article was published, such as the price of the service or API.
After adding the database to our project, credentials will automatically be added to the environment variables.
We can use the query console to create the first table in the panel.
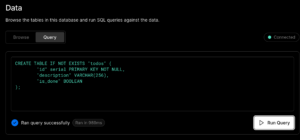
Thus, we have created a table for our todos! We can now proceed to connect to the database in our application.
Handling database queries
Let’s add an endpoint in the </span><span style="font-weight: 400">api/todos.ts file to handle todos:
|
1 2 3 4 5 6 7 8 9 10 11 12 13 14 15 16 17 18 19 20 21 22 23 24 25 26 27 28 29 30 31 |
import { VercelRequest, VercelResponse } from "@vercel/node"; import { db } from "@vercel/postgres"; export default async function (request: VercelRequest, response: VercelResponse) { const client = await db.connect(); switch (request.method) { case 'GET': const todosQuery = await client.sql `SELECT * FROM todos;`; response.status(200).json({ todos: todosQuery.rows, }); break; case 'POST': const q = request.body; const createTodoQuery = await client.sql `INSERT INTO todos (description, is_done) VALUES (${q['description']}, false);`; response.status(200).json({ todos: createTodoQuery.rows, }); break; default: response.status(405).send({ message: `Method not supported`, }); } }; |
Connect API Route to Angular service
Our endpoint is ready, now we just need to handle it on the Angular side.
|
1 2 3 4 5 6 7 8 9 10 11 12 13 14 15 16 |
@Injectable() export class TodosService { private readonly _http = inject(HttpClient); getTodos(): Observable<Todo[]> { return this._http.get<{ todos: Todo[] }>('/api/todo').pipe( map((resp) => resp.todos) ); } addTodo(description: string): Observable<void> { return this._http.post<void>('/api/todo', { description }); } } |
This is how we created a full-stack todo app!
Local production builds
So far, we have been using the </span><span style="font-weight: 400">vercel dev command to start a local server. At first glance, we may be concerned about the lack of configuration parameters used by Angular CLI by default, such as in the </span><span style="font-weight: 400">ng serve command. Let’s say we would like to be able to preview the production build. Vercel allows us to create a configuration file where we can override the commands we run.
To do this, create a </span><span style="font-weight: 400">vercel.json file in the root directory of the project, and then add the corresponding line with the key you want to modify. </span><span style="font-weight: 400">devCommand corresponds to starting the development server. We must additionally pass the port imposed by the Vercel CLI.
|
1 2 3 |
{ "devCommand": "ng serve --configuration production --port $PORT" } |
After rerunning the </span><span style="font-weight: 400">vercel dev command, our config will be automatically detected along with the overwritten commands. However, this is not the best option, as switching between different configs would require changing this file each time. A better solution is to rename the file so that it is not automatically detected, for example, to </span><span style="font-weight: 400">vercel.prod.json . We can now pass this file as a configuration when running dev by using the </span><span style="font-weight: 400">local-config argument.
|
1 |
vercel dev --local-config vercel.prod.json |
Summary
Vercel is an excellent choice for deploying Angular applications. It offers useful features and integrations, a friendly control panel, and automated CD processes. The free Hobby Plan is sufficient for side-projects.
We have only touched on a few of the most important aspects. For the full scope of knowledge, I encourage you to visit the documentation at https://vercel.com/docs Exemplary Angular+Vercel application we built for this article is available in a repository on github at the link https://github.com/Dyqmin/ng-vercel-app
Hi, i have deployed my angular application to multiple deployment platforms like netlify,vercel and gh pages.When i deploy on vercel the deployment is successfull but the url says 404 code not found.Please help
Hi, make sure you’re using Angular preset in your project settings on Vercel. While being there, check also if all auto-generated commands and paths match your actual ones.
I have created an ‘api’ folder next to the ‘assets’ folder. Then, I defined it as an asset in the ‘project.json’ file. After a successful build, the ‘api’ folder appears in my ‘dist’ folder. However, when I attempt to access the ‘/api/hello’ path, I am redirected to Angular routing. What am I doing wrong?
The
apidirectory should be located at the project’s root level, next to thesrcfolder. I hope that solves the issue!