


Recently, we have been very actively trying to support the Angular community. Lately, we have organized two MeetUps in Warsaw, focused on NestJS and Angular. Additionally, in October we took part in workshops with Michael Hladki (you can read about our impressions after the workshops here), and now we are preparing for the biggest Angular event in Poland – ngPoland conference.
Despite many activities, we are not slowing down and we are still trying to keep blogging. Those of you who follow our profile on Facebook surely noticed that for some time we started creating short, but informative tips from the angular world. In order to make it easier for you, we have gathered them all together in one article. Are you curious? Let’s go!
@Input setter vs ngOnChanges
Adding a setter to an angular @Input and using the lifecycle-hook ngOnChanges are two different ways to detect and handle changes of values passed through inputs to a component.
But which one is better? Well… – it depends.
|
1 2 3 4 5 6 7 8 9 10 11 12 13 14 15 16 17 18 19 20 21 22 23 24 25 26 |
import { ChangeDetectionStrategy, Component, Input, OnChanges, SimpleChanges} from '@angular/core'; @Component({ selector: 'app-product', template: ``, changeDetection: ChangeDetectionStrategy.OnPush, }) export class ProductComponent implements OnChanges { @Input() set productDetails(details: ProductDetails) { // handle product details change } @Input() owner: ProductOwner; @Input() category: ProductCategory; ngOnChanges(changes: SimpleChanges): void { // handle any input changes } // ... other stuff } |
The solution with setter ensures that the setter will be called if and only the value associated with it changes (or is set for the first time).
The ngOnChanges method will be called each time the value in any input changes (if multiple inputs change their values during single change -detection cycle, ngOnChanges I will still be called once).
Setter works great if you only want to listen for changes on a single value (independently from the other inputs).
If we want to observe the combination of values from several inputs, then ngOnChanges is the only solution. We recommend using its argument (SimpleChanges), which cantains information about which values have changed (including previous and new values for each input).
We advise against using ngOnChanges without verifying the SimpleChanges object (which fields have changed), and recommend using setters if possible.
Required Input
Have you created an Angular component that needs an Input defined by you to work? See how to force the consumer of that component to use the given component along with the Input.
Suppose we have the following component:
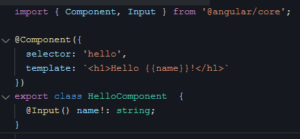
To force this component to be used with “name”, add “name” to the selector inside the square brackets.
![]()
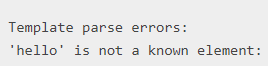
This will tell the compiler that in addition to the “hello” component name, this component must also have a “name” attribute. With this configuration, using our component without “name”, will cause the following compilation error:
ng-deep
We assume that you did not miss the fact that some time ago this selector was marked as deprecated. Fortunately, there are alternatives for styling elements of nested components.
Basically, we have two options:
- set the styling for the nested component elements in the global styles file,
- set the property encapsulation in the metadata of the component that is meant to style the nested components: ViewEncapsulation.None, and then style the elements in the style file of that component.
Both of these approaches have their advantages and disadvantages, but in both cases the best way to make sure that the styles will not be applied where we do not want them is to take care of precise selectors for the elements we want to style.
What are your experiences in this topic? Did you encounter any difficulties using one of these options, did you use another one, or maybe you still use ng-deep?
ng-content
When creating Angular components, there is often a need to make a projection of a piece of HTML from the parent to the child. This means that we can effectively ‘inject’ HTML into the child templates. To achieve this, we will use the ng-content tag as a sort of placeholder for the ‘injected’ value inside the child theme.
|
1 2 3 4 5 6 7 8 9 10 11 12 13 14 15 16 17 18 19 20 21 22 23 24 25 26 27 28 29 30 31 32 33 34 35 36 37 38 39 40 41 42 43 44 45 46 47 48 49 50 |
/* Projecting template from parent to child component using ng-content with selector */ import { Component } from '@angular/core'; @Component({ selector: 'app-root', template: `<app-child> <p class="class" attr>class attr</p> <p class="class">class</p> <p attr>attr</p> <p attr2>attr2</p> <p attr3>attr3</p> </app-child>`, }) export class AppComponent {} @Component({ selector: 'app-child', template: ` <div> <h1>Not matching any of selectors:</h1> <ng-content></ng-content> <h1>By attribute:</h1> <ng-content select="[attr]"></ng-content> <h1>By class:</h1> <ng-content select=".class"></ng-content> <h1>By class and attribute:</h1> <ng-content select=".class [attr]"></ng-content> </div>`, }) export class ChildComponent {} // RESULT /* Not matching any of selectors: attr2 attr3 By attribute: class attr attr By class: class By class and attribute: */ |
Nothing stands in the way of having many such placeholders and each of them dedicated to a given HTML fragment. To do this, we must use the ng-content tag with an additional attribute – select. It accepts values similar to document.querySelector, so we can select e.g. by tag, attribute, CSS class or combination of all selectors at once.
If the passed element meets the condition of more than one placeholder it will be injected into the first one.
On the other hand, all elements that do not match any of the selectors will be injected in place of the ng-content tag without a selector.
ngFor – useful local variables
The ngFor directive is probably known by everyone. We use it when we need to iterate over a collection in a template. But probably not everyone remembers about all the useful local variables it provides. Here they are:
- index: number: index of the current element, as always counted from 0,
- count: number: the number of all elements,
- first: boolean: the flag indicating if the element is first,
- last: boolean: flag that says if element is last,
- even: boolean: flag that says if element index is even,
- odd: boolean: flag that indicates if item’s index is odd,
We can assign aliases to variables in several different ways (as shown in the example below). For more complex templates, especially when ngFor is nested inside another ngFor, it is worth giving them precise names.
|
1 2 3 4 5 6 7 8 9 10 11 12 13 14 15 16 17 18 19 |
<div *ngFor="let item of items; index as currentIndex; first as first; last as last; even as isEven; let isOdd = odd; let count = count; "> <app-item [item]="item" [index]="currentIndex" [first]="first" [last]="last" [count]="count" [even]="isEven" [odd]="isOdd" > </app-item> </div> |
Also remember that the variables even and odd tell you the (un)parity of the index, not the element itself (for the first element, with index equal to 0, the values are as follows: even === true; odd === false).
Let me know if you also had to calculate some of these ‘manually’ (e.g. replace first with index === 0)?
TrackBy
Do you ever use the trackBy funcion while using ngFor?
It’s a good way to improve performance, especially when the collection we’re iterating over may change.
By default, Angular tracks collection elements by reference. Performing an operation on a collection will cause the change of reference, so when the data changes e.g. as a result of a user action or API request, Angular will detect the change, remove all the collection elements from the DOM and create them anew. The larger the size of the collection, the greater the negative impact on performance.
The trackBy function comes in handy, as it allows Angular to detect added or deleted items.
|
1 2 3 4 5 |
<ul> <li *ngFor="let item of items; trackBy: trackByIndexFn"> {{ item.name }} </li> </ul> |
|
1 |
trackByIndexFn = (index: number, item: Item) => index; |
This function takes an index and the current element as arguments. It should return a unique identifier for the element.
This way, when the collection changes, instead of using references, Angular will keep track of the elements based on the unique identifier. It will then recognize which elements have been added or removed and, as a result, create or remove only those elements that have changed.
RxJs subscription
If you have ever noticed that after destroying a component and creating it again, the application starts using more and more memory, you are probably dealing with memory leaks. This is often caused by uncleared subscriptions. One way to clear subscriptions is to call the unsubscribe() method on the Subscription object returned by the subscribe() method, but this is not the only option. We’d love to hear what are your favorite and hated unsubscribe methods and why?
Below are some examples:
Using UntilDestroy:
|
1 2 3 4 5 6 7 8 9 10 11 12 13 |
import { Component, OnInit } from "@angular/core"; import { UntilDestroy, untilDestroyed } from "@ngneat/until-destroy"; import { interval } from 'rxjs'; @UntilDestroy() @Component({}) export class InboxComponent implements OnInit { ngOnInit(): void { interval(1000) .pipe(untilDestroyed(this)) .subscribe(); } } |
Using Subject:
|
1 2 3 4 5 6 7 8 9 10 11 12 13 14 15 16 17 18 |
import { Component, OnInit, OnDestroy } from "@angular/core"; import { Subject, interval, takeUntil } from 'rxjs'; @Component({}) export class InboxComponent implements OnInit, OnDestroy { destroy$: Subject<boolean> = new Subject<boolean>(); ngOnInit(): void { interval(1000) .pipe(takeUntil(this.destroy$)) .subscribe(); } ngOnDestroy(): void { this.destroy$.next(true); this.destroy$.unsubscribe(); } } |
Using subscription add:
|
1 2 3 4 5 6 7 8 9 10 11 12 13 14 15 16 17 18 19 20 21 22 |
import { Component, OnDestroy, OnInit } from "@angular/core"; import { Subscription, interval } from 'rxjs'; @Component() export class InboxComponent implements OnInit, OnDestroy { subscription1: Subscription; subscription2: Subscription; allSubscriptions = new Subscription(); ngOnInit(): void { this.subscription1 = interval(1000).subscribe(); this.subscription2 = interval(500).subscribe(); this.allSubscriptions.add(this.subscription1); this.allSubscriptions.add(this.subscription2); } ngOnDestroy(): void { this.allSubscriptions.unsubscribe(); } } |
data typing in dialogs
When creating a component that you will use as a material dialog, do you ever use the mat-dialog-close directive in the component’s template to pass data after it is closed? This is the most correct approach, but it can easily turn into a hard-to-find bug that, fortunately, we can easily avoid!
The problem is that the dialogResult parameter takes is of type any! This way you can accidentally return data that is not of the expected type.
A better alternative is to provide a reference to the open dialog in the object constructor:
dialogRef: MatDialogRef<ExampleDialogComponent, ExampleDialogOutput>
Its first generic type is mandatory, and of course indicates the type of the component used, while the second, important in our case, tells us the type of the returned data.
Then we use it in the method called the method triggered by the closing button in the dialog, e.g:
this.dialogRef.close({ result: ‘I love Angular <3’ });
Type compatibility is obviously preserved here, because this.dialogRef.close takes an argument of the declared type ExampleDialogOutput.
What else is important? To always declare interfaces for data provided to such component and for data returned by it and to use them in the dialog component and in the component from which the dialog is opened!
this.dialog.open<ExampleDialogComponent, ExampleDialogInput, ExampleDialogOutput>(
ExampleDialogComponent,
{ data: inputObj }
).afterClosed()
Declaring explicitly what type the input data should be ensures that the inputData variable is of the specified type, while declaring the output data type ensures that the value obtained from the Observable returned by the afterClosed method will be of the correct type.
|
1 2 3 4 5 6 7 8 9 10 11 12 13 14 15 16 17 18 19 20 21 22 23 24 25 26 27 28 29 30 31 32 33 34 35 36 37 38 39 40 41 42 43 44 45 46 47 48 49 50 51 52 53 54 55 56 57 58 59 60 61 62 63 64 65 66 67 68 69 70 71 72 73 74 75 |
import { Component, Inject } from '@angular/core'; import { filter } from 'rxjs/operators'; import { MatDialog } from '@angular/material/dialog'; import { MAT_DIALOG_DATA, MatDialogRef } from '@angular/material/dialog'; export interface ExampleDialogInput { input: string; } export interface ExampleDialogOutput { result: string; } @Component({ selector: 'app-root', template: `<div> <mat-form-field> <mat-label>Input data</mat-label> <input placeholder="Input data" matInput [(ngModel)]="input" /> </mat-form-field> <button mat-raised-button color="primary" (click)="openDialog()"> Open dialog </button> <h2 *ngIf="!!result">{{ result }}</h2> </div> `, }) export class AppComponent { input = ''; result?: string; constructor(private dialog: MatDialog) {} openDialog(): void { this.dialog .open<ExampleDialogComponent, ExampleDialogInput, ExampleDialogOutput>( ExampleDialogComponent, { data: { input: this.input }, } ) .afterClosed() .pipe(filter((output) => !!output)) .subscribe((output) => (this.result = output!.result)); } } @Component({ selector: 'app-example-dialog', template: ` <h2 mat-dialog-title>Input data: {{ data.input }}</h2> <div mat-dialog-content> <mat-form-field> <input matInput [(ngModel)]="result" /> </mat-form-field> </div> <div mat-dialog-actions align="end"> <button mat-flat-button (click)="cancel()">Cancel</button> <button mat-flat-button (click)="submit()">Submit</button> </div>`, }) export class ExampleDialogComponent { result = ''; constructor( protected dialogRef: MatDialogRef< ExampleDialogComponent, ExampleDialogOutput >, @Inject(MAT_DIALOG_DATA) public data: ExampleDialogInput ) {} submit(): void { this.dialogRef.close({ result: this.result }); } cancel(): void { this.dialogRef.close(); } } |
In summary – with these simple two rules:
- Provide dialogRef: MatDialogRef ExampleDialogComponent, ExampleDialogOutput> and use the close method to close the dialog with data passing instead of the mat-dialog-close directive,
- Declare interfaces for input and output data and use them both in the dialog component and at the dialog opening point,
we are able to provide total consistency of data types passed to and from the dialog component!
At the end
As you can see, we have collected some angular tips so far. However, we are not slowing down! You can be sure that we will share with you all the angular tips and news on a regular basis. If you don’t want to miss anything, we recommend that you keep an eye on our Facebook and Twitter profiles. There, we usually inform you about events and Angular Meetups organized by House of Angular or ngPoland, discount codes for courses and training, competitions, in which you can win our Angular gadgets, tickets for events, training and courses. Besides, of course, we always let you know about new articles, tips and news from the world of Angular and NestJS!
Leave a Reply