
Overall idea behind this article to explain and demonstrate the usage of [ControlValueAccessor](https://angular.io/api/forms/ControlValueAccessor) and [Validator](https://angular.io/api/forms/Validator) interfaces. The former is used to bind together a FormControl from Forms package and native DOM elements. The latter is used to implement validation logic. They can exist independently of each other, but in this article we’ll implement both using a single directive. Our directive will add the following functionality to the application:
- Conversion between input value and control value
- Validation for invalid date
If you’re using ControlValueAccessor for the first time, I would recommend going through this article first: Never again be confused when implementing ControlValueAccessor in Angular forms.
Conversion of values
We will first create a directive and handle conversion between UI and control value.
import { Directive } from '@angular/core';
import { ControlValueAccessor, NG_VALUE_ACCESSOR } from '@angular/forms';

@Directive({
  selector: 'input[type=date]',
  providers: [
    {
      provide: NG_VALUE_ACCESSOR,
      useExisting: DateInputDirective,
      multi: true
    }
  ]
})
export class DateInputDirective implements ControlValueAccessor {
  constructor() {}
  writeValue(obj: any): void {}
  registerOnChange(fn: any): void {}
  registerOnTouched(fn: any): void {}
}
We mainly did 3 things for directive:
- Set the selector to
input[type=date]– This will add the conversion mechanism and validations to all date-inputs without any extra effort. - Defined
DateInputDirectiveclass as Value Accessor through theNG_VALUE_ACCESSORtoken. Our directive will be used by Angular to set-up synchronisation withFormControl. implemented theControlValueAccessorinterface
For this example, we are only concerned with two methods on the interface:
writeValue– this method is used to write a value to the native DOM element. Simply put, this can be utilised to convertFormControlvalue to UI value.registerOnChange– This method will help us to store a function, which will be called by value-changes on the UI. In simpler terms, with this we can convert UI value toFormControlvalue.
This illustration from the linked article above demonstrates this mechanism:
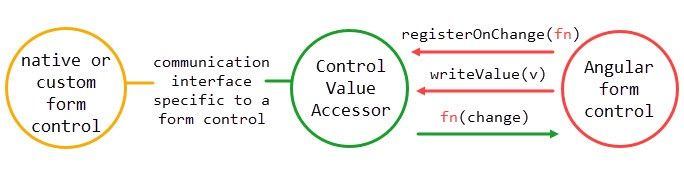
This illustration from the linked article above demonstrates this mechanism
Writing value to the native DOM element with writeValue
We want to show the correct and formatted date on the UI when it gets updated through FormControl.
For example, let’s assume that we are getting ISO string of date from our API, which looks something like this: 1994-11-05T08:15:30-05:00, and when we set the value for FormControl bound to the date input, we want the input[type=date] to display date in correct format.
The code below demonstrates how we convert the ISO string into YYYY-MM-DD before we set the resulting value for the native HTML date input:
import { formatDate } from '@angular/common';

// ...
export class DateInputDirective implements ControlValueAccessor {
  writeValue(dateISOString: string): void {
      const UIValue = formatDate(dateISOString, 'YYYY-MM-dd', 'en-IN');

      this._renderer.setAttribute(
        this._elementRef.nativeElement,
        'value',
        UIValue
      );
  }
}
Here’s what’s going on above:
- We are creating a string called
UIValue, which will hold the date inYYYY-MM-DDformat. As you can see, we have used theformatDatefunction from@angular/commonto get the formatted date. - And then, we are setting
input’svalueattribute usingRenderer2
Let’s quickly try out the above changes:
@Component({
  selector: 'app-root',
  templateUrl: './app.component.html',
})
export class AppComponent {
  fg = new FormGroup({
    date: new FormControl(new Date().toISOString()),
  });

  get date() {
    return this.fg.get('date');
  }
}
Note 2 things in above code:
- We set the current date’s ISO string in date
FormControl, ideally you would get it from some API. - We created a
dategetter to get theFormControl. In a reactive form, you can always access any form control through thegetmethod on its parent group, but sometimes it's useful to define getters as shorthand for the template.
<form [formGroup]="fg">
  <input
        type="date"
        id="birthDate"
        formControlName="date"
      />
  <div>
    <code>
        <b>Control Value: </b>{{ date.value }}
    </code>
  </div>
</form>
If you look at the output now, it is setting the correct date in input:
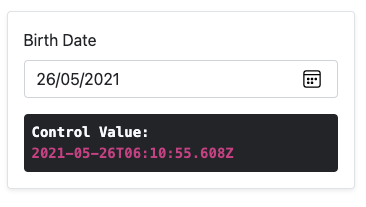
Output after setting writeValue
Getting value from the native DOM element with registerOnChange
The DOM element holds the value as formatted date. When the user updates the value, we'll need to convert it to a valid ISO string.
Let’s add a HostListener first:
export class DateInputDirective implements ControlValueAccessor {

  @HostListener('input', ['$event.target.valueAsNumber'])
  onInput = (_: any) => {};

  // ...
}
We are using $event.target.valueAsNumber to read the value. valueAsNumber returns the timestamp in milliseconds, the reason we are using it is because it will help us directly get date using new Date(valueAsNumber). Also notice the onInput function above, it’s just a skeleton for now.
It’s time to implement the conversion logic in registerOnChange:
// …

export class DateInputDirective implements ControlValueAccessor {

  // …

  registerOnChange(fn: (_: any) => void): void {
      this.onInput = (value: number) => {
        fn(this.getDate(value).toISOString());
      };
  }
}
registerOnChange is called just once by Angular, passing us the callback named fn in the code above. We can use this callback to update the FormControl value as a reaction to DOM element update. And we are calling it on the input event of date-input through onInput function.
We also need to create a couple of helper functions, you can change them as per your need:
getDate(value: number) {
    if (value) {
      const dateObj = new Date(value);
      return this.isValidDate(dateObj) ? dateObj : { toISOString: () => null };
    }
    return { toISOString: () => null };
}

isValidDate(d: Date | number | null) {
    return d instanceof Date && !isNaN(d as unknown as number);
}
Let’s look at the output now:

Output after setting registerOnChange
As you can see, it’s updating the control's value with a valid ISO string.
Validation
Now we will add the validation part so that date-input supports validation out-of-the box.
We will first add [NG_VALIDATORS](https://angular.io/api/forms/NG_VALIDATORS) in providers:
// …

@Directive({
  selector: 'input[type=date]',
  providers: [
    {
      provide: NG_VALUE_ACCESSOR,
      useExisting: DateInputDirective,
      multi: true,
    },
    {
      provide: NG_VALIDATORS,
      useExisting: DateInputDirective,
      multi: true,
    },
  ],
})
Next, we will implement the Validator interface and add validate method:
export class DateInputDirective implements ControlValueAccessor, Validator {

  // ...

  validate(control: AbstractControl): ValidationErrors | null {
    const date = new Date(control.value);
    return control.value && this.isValidDate(date) ? null : { date: true };
  }
}
Angular will call the validate method whenever the value of the control changes.
Let’s modify the template to utilize validation:
<form [formGroup]="fg">
  <input
        type="date"
        id="birthDate"
        formControlName="date"
      />
  <div class="invalid-feedback" *ngIf="(date?.touched || date?.dirty) && date?.invalid">
        Invalid Date
  </div>
</form>
As you can see, we added a div to show a validation message. It uses the date getter defined in the component class.
Let’s understand the *ngIf 's expression:
*ngIf="(date?.touched || date?.dirty) && date?.invalid"- We don’t want to show validation message if user has not interacted with the input, so we have added
date?.touched || date?.dirty - We also don’t want to show if
dateis valid, so we addeddate?.invalid
You can read more about Validating form input on Angular docs.
Let’s look at the output now:

Output after implementing Validator
Conclusion
We learned below:
How to use ControlValueAccessor to
- Convert UI value to valid ISO string and attach it to form-control’s value
- Convert form-control’s ISO string value to
YYYY-MM-DDformat and update the same on UI
How to use Validator to validate user input for date
You can find the code on Stackblitz and GitHub.
Thanks for reading!