
If you’re new to Angular, one tool will follow you through your whole journey: the Angular CLI. Every tutorial uses it, every Angular project depends on it, and once you’re comfortable with it, building Angular apps feels much smoother.
What is Angular CLI?
CLI stands for command-line interface, a program you control by typing commands in a terminal instead of clicking buttons. The Angular CLI is the official command-line tool from the Angular team, and you use it through a single command called ng.
Starting an Angular app without it would mean:
- creating dozens of folders and config files by hand
- installing and wiring together a build system, a compiler, and a test runner
- writing repetitive boilerplate for every component and service
- keeping all of that up to date whenever Angular changes
The CLI does all of this for you. You type a short command, and it produces a correct, consistent, up-to-date result that follows Angular’s recommended conventions. It also means your project looks familiar to other Angular developers, which helps when you join a team or ask for help online.
In short, the CLI can:
- Create a ready-to-run project (ng new)
- Run it locally with live reloading (ng serve)
- Generate components, services, and other pieces (ng generate)
- Test your code (ng test)
- Build an optimized version for the web (ng build)
- Add libraries and update Angular itself (ng add, ng update)
Using Angular CLI
Time to put the CLI to work: in this chapter you’ll install it, create a project, run it in your browser, and generate your first components and services. Follow along in your terminal to get comfortable with the commands you’ll use every day.
Before you start: install Node.js
The CLI is a Node.js program, so you need Node.js installed first. It comes bundled with npm (Node Package Manager), which downloads and manages the libraries your project uses.
Angular only supports certain Node.js versions, and these change over time, so check the version requirements on angular.dev before installing. Once it’s installed, open a terminal and confirm both tools work:
node -v
npm -v
If each command prints a version number, you’re ready.
Installing Angular CLI
Install it globally so ng works from any folder:
npm install -g @angular/cliand check if that worked:
ng versionYou’ll see an ASCII-art Angular logo along with the versions of the CLI, Node.js, and your operating system.
If you prefer not to install anything globally, you can run the CLI on demand with npx:
npx @angular/cli new my-appThis downloads the CLI temporarily, uses it, and leaves your system clean. Inside a project, npx ng serve also uses the version installed in that project rather than a global one. That matters when you work on several projects that use different Angular versions.
Creating a project
Choose a folder where you keep your projects, then run:
ng new hello-angularThe CLI asks a few questions. The exact wording changes between versions, but you’ll typically see prompts like these:
- Which stylesheet format would you like? CSS is the simplest choice. SCSS is popular if you already know Sass. Selecting Tailwind CSS automatically handles its setup for you
- Do you want to enable Server-Side Rendering (SSR) and Static Site Generation (SSG/Prerendering)? This is an advanced feature that helps with search-engine visibility and initial load speed. Answer “No” while learning. You can add it later.
- Which AI tools do you want to configure with Angular best practices? Specifies which AI tools to generate configuration files for. These files are used to improve the outputs of AI tools by following the best practices.
The CLI now creates a hello-angular folder, fills it with files, installs dependencies, and usually sets up a Git repository. This takes a minute or so. When it finishes, move into the project:
cd hello-angularMost CLI commands only work when your terminal is inside a project like this.
Running your app
Start the development server:
ng serveAfter a short build, you’ll see a message that your app is available at http://localhost:4200. Open that address in your browser and you’ll see Angular’s starter page.
Here’s the part that makes the CLI so pleasant: leave the server running and keep editing your code. Every time you save a file, the CLI rebuilds your app and the browser updates automatically. You don’t need to stop, restart, or refresh anything by hand. When you’re done for the day, stop the server.
Useful options:
| ng serve –open # opens your browser automatically (short: -o)ng serve –port 4300 # use a different port if 4200 is busyng serve –host 0.0.0.0 # let other devices on your network reach the app |
Open the project folder in your code editor. It can look overwhelming at first, but you’ll only touch a small part of it. The exact files differ slightly between Angular versions, but a recent project looks roughly like this:
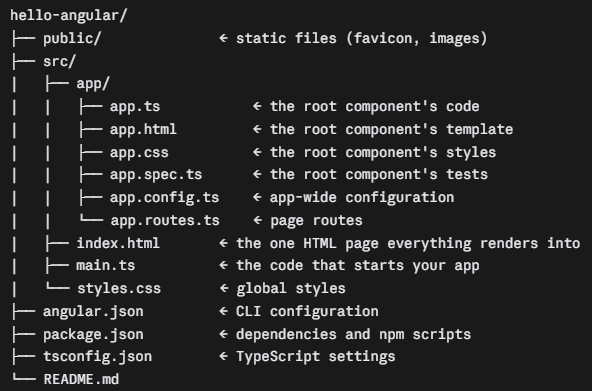
Here’s what matters most for a beginner:
- src/app/ is where you’ll spend nearly all your time. Your components, services, and pages live here.
- src/index.html is the only real web page in an Angular app. Angular fills it with content. Inside you’ll find a tag named <app-root>, which is where your root component appears.
- src/main.ts is the entry point. It tells Angular which component to start with.
- angular.json holds settings for the CLI itself: how to build, serve, and test your project.
- package.json lists the libraries your project depends on, plus shortcut scripts like npm start, which runs ng serve.
- node_modules/ holds all downloaded libraries. It’s large, and you never edit it. Git ignores it automatically.
Older projects name files with a .component part (like app.component.ts). Newer ones drop it following the latest Angular’s styleguide.
Generating code
This command saves you the most time. It creates pieces of your app with the right structure, the right file names, and the right boilerplate. The most commonly created piece of Angular app is component:
ng generate component greetingThe short form does the same thing:
ng g c greetingThe CLI creates a greeting folder inside src/app/ containing the component’s code, template, stylesheet, and test file. You can also put it in a subfolder by including a path:
ng g c components/greetingOptions worth knowing:
| Option | What it does |
| –dry-run | Shows what would be created without writing any files |
| –skip-tests | Doesn’t create the .spec.ts test file |
| –inline-template | Puts the HTML inside the TypeScript file instead of a separate file |
| –inline-style | Puts the CSS/SCSS inside the TypeScript file |
| –flat | Doesn’t create a folder for the component |
The same ng generate command can create many other things (run ng generate –help to see complete list for your version):
| Command | What it creates | What it’s for |
| ng g service products | A service | Shared logic or data fetching |
| ng g directive highlight | A directive | Adding behavior to existing elements |
| ng g pipe shorten | A pipe | Transforming values shown in templates |
| ng g guard auth | A route guard | Controlling access to pages |
| ng g interface user | An interface | Describing the shape of your data |
| ng g enum status | An enum | A fixed set of named values |
A beginner tip: get in the habit of adding –dry-run the first few times you use a new generate command. It’s a free preview, and it teaches you exactly what the CLI does.
Testing your code
Every generated component, service, directive, pipe and guard comes with a .spec.ts file (unless you opt-out with –skip-tests flag), a starter test that checks if the piece can be created. To run your tests:
ng testNew projects come with Vitest and jsdom already installed, so they’re ready to test immediately. The ng test command builds your app in watch mode and re-runs the tests whenever you save a file. If you’d rather run the tests once and exit, which is common in automated pipelines, add –watch=false.
One historical note: Vitest is the default test runner for new projects created with Angular 21 and later. Older projects use a different runner called Karma, which is still supported if your project uses it. The ng test command is the same either way.
Building for production
The development server is for working on your app. When you’re ready to put it online, create an optimized build:
ng buildThe CLI compiles your TypeScript, bundles everything together, removes unused code, and shrinks the result. The output lands in the dist/{projectName}/browser folder. You upload the contents of that folder to a web host such as Firebase Hosting, Netlify, Vercel, or GitHub Pages.
Some useful variations:
ng build --configuration development   # faster, unminified build for debugging
ng build --watch                                    # rebuilds whenever you save a file
For new projects, the application build system, based on the @angular/build package, has been the default since version 20. You don’t need to configure anything to use it. It’s what makes both ng serve and ng build fast. Note that high-performance building isn’t entirely new – underlying technologies like esbuild were already supported as optional builders starting in version 17.
Adding libraries
You can install libraries with plain npm install, but many Angular libraries also need configuration changes. ng add installs the library and runs its setup:
ng add @angular/materialThis adds Angular Material, a popular set of ready-made UI components like buttons, dialogs, and tables, and configures a theme and fonts for you. Other libraries you may meet include angular-eslint for code linting, which is the way to set up ng lint, since linting isn’t included in new projects by default.
Keeping Angular up to date
Angular releases new major versions regularly. The CLI helps you upgrade with:
ng updateRun on its own, this lists which packages have updates available. To upgrade Angular itself:
ng update @angular/core @angular/cliThe command doesn’t just bump version numbers. It also runs migrations that automatically rewrite parts of your code to match new conventions. For big version jumps, check the official Angular Update Guide, which gives step-by-step advice for your specific starting and target versions. Commit your work to Git first so you can review exactly what changed.
Troubleshooting common problems
Errors are a normal part of working with the CLI, and most have quick, well-known fixes. Before digging in, read the error message, confirm you’re inside your project folder, and check your versions with ng version.
“ng is not recognized” or “command not found”
The global install didn’t complete, or your terminal doesn’t know about it yet. Close and reopen the terminal and try again. If it still fails, reinstall with npm install -g @angular/cli. On some systems you may need administrator permissions, or you can use npx instead.
“Port 4200 is already in use”
Another program (or a previous ng serve you forgot to stop) is using the port. Stop the old one or run the application on another port using ng serve –port 4300.
“This command is not available when running the Angular CLI outside a workspace”
You’re in the wrong folder. Move into your project directory, the one that contains angular.json, and try again.
Strange build errors that make no sense
Try stopping the server, running ng cache clean, and starting again. If that fails, delete the node_modules folder and run npm install.
Where to go from here
You now understand the CLI’s main job: it handles setup, generation, running, testing, and building, so you can concentrate on your app itself. The CLI has many more options than we’ve covered (visit documentation for further reference), but you don’t need to memorize them. Get comfortable with ng new, ng serve, and ng generate, and use –help whenever you’re curious. Happy building!